Working in pairs, you will build a Linux-based virtualization host server on hardware provided in the class.
virt-manager GUI and the virsh command-line interface to install and manage a VM.NOTE: get into the habit of logging into the server as a normal user, and try to avoid logging in as "root". You will see a prompt which ends with $. It's advisable to disable logging in as root directly over SSH (not covered here).
If there is a single command you wish to run as root, prefix it with sudo. If you have a series of commands to run as root, start a root shell with sudo -s, and the prompt will change to #. When you have finished, type exit to leave the root shell.
libvirt# apt-get install qemu-kvm libvirt-binNow add the 'nsrc' user into the 'libvirt' group.
# usermod -G libvirt -a nsrcThis is needed so you can talk to the libvirt daemon. If you are currently logged in as 'nsrc' you will need to logout and login again to pick up this group. The command "id" will show you what groups you are a member of.
At a command line prompt, type the following:
# virt-host-validateThe output should look like:
  QEMU: Checking for hardware virtualization                                 : PASS
  QEMU: Checking for device /dev/kvm                                         : PASS
  QEMU: Checking for device /dev/vhost-net                                   : PASS
  QEMU: Checking for device /dev/net/tun                                     : PASS
   LXC: Checking for Linux >= 2.6.26                                         : PASS
Another way to check:
To verify, do:
$ ls -l /dev/kvmIf you see:
crw-rw---- 1 root kvm 10, 232 Jan 17 21:24 /dev/kvmThen it's OK 1
If KVM acceleration is not available, then you may need to reboot into the BIOS settings and enable VT-x (Intel) or AMD-V (AMD).
Install an X11 desktop (which we want just so that we can run virt-manager)
# apt-get install xorg lxde lightdm ssh-askpass chromium --no-install-recommendsThis will take a while - be patient!
Once the install is finished, start the graphical environment:
# service lightdm startYou should now be able to login to the graphical environment as the "nsrc" user. You can get a shell window using Start > System Tools > LXTerminal.
Do so now.
You can also switch between text and graphical consoles using Ctrl-Alt-F1 and Ctrl-Alt-F7 respectively.
# apt-get install virt-managerThis installs a lot of extra packages because it depends on a lot of graphics libraries.
On the virtualization host you have just built, you are going to install Ubuntu Server in a VM, using the virt-manager GUI which is similar to the VirtualBox GUI.
First, copy the file ubuntu-14.04.5-server-i386.iso into the directory /var/lib/libvirt/images on your host.
How to do this depends on where you are copying the image from.
/media/XXX), and open a window.(XXX will be a random number, look at the title of the window)
You can then copy the ISO:
~~~
# cp /media/XXX/iso/ubuntu-14.04.5-server-i386.iso /var/lib/libvirt/images/
~~~
If it doesn't work, you may need to mount it by hand:
~~~
# dmesg | tail        # find the ID of the device just inserted, e.g. sdb
# mount /dev/sdb1 /mnt
# ls /mnt             # find the file
# ls /mnt/iso         # find the file
# cp /mnt/iso/ubuntu-14.04.5-server-i386.iso /var/lib/libvirt/images/
# umount /mnt
~~~
If you are copying from a web server:
# cd /var/lib/libvirt/images
# wget http://www.ws.nsrc.org/downloads/ubuntu-14.04.5-server-i386.isoUse Start > System Tools > Virtual Machine Manager, or just type virt-manager at a terminal prompt while in the GUI.
NOTE: to release the keyboard and mouse, press left-CTRL and left-ALT together.
In the Virtual Machine Manager window:
ubuntu-14.04.5-server-i386.iso (if it's not there, click "Browse Local", choose File System on the left, and browse to where you copied/downloaded the Ubuntu ISO image), then click on Choose VolumeUbuntu 13.10 (Saucy Salamander) (or later)At this point the VM will start and the console should appear. Continue to install your Ubuntu virtual machine however you like. Follow the instructions from the VirtualBox exercise if you wish. We recommend using "Guided - use entire disk" for partitioning, and please enter http://apt.ws.nsrc.org:3142/ for the HTTP proxy. Install the "OpenSSH Server" package.
When it has finished and rebooted, your VM should come back up. Login, type "ifconfig" to find what IP address it has come up on. This should be an address on 10.10.0.X which has been picked dynamically via DHCP.
SSH into this address from your laptop (e.g. using Putty) and login. If you didn't select OpenSSH Server during the installation, then you can add it using apt-get install openssh-server
Congratulations: you have a created a working VM, it is on the network, and you have remote access to it!
Back on your host, you should be able to find the running kvm (or qemu-system) process like this:
$ ps auxwww | egrep '(kvm|qemu-system)'Note the very large number of command line parameters given to kvm. Now you can see why we need libvirt to manage this for us :-)
The disk image file is in the directory /var/lib/libvirt/images and you can find it like this:
# cd /var/lib/libvirt/images
# ls -slh
It's probably called ubuntu1.qcow2, or whatever name you gave it when you created it.
Note that the total size of the file is 4.0GB, but the disk space used (the left-hand column on the line) is less than this. This is because the default format used by virt-manager, QCOW2, only allocates space as required [^2].
[^2] This is not to be confused with a sparse file. Newer versions of the QCOW2 format allow preallocation, where all free space is written out to the file.
To view how much space is really used, you can use the du (disk use) command, like so:
# du -m *-m = megabytes
When you are logged into the VM host platform remotely, e.g. over ssh, it's often far easier and quicker to interact using the command line rather than trying to pull back a graphical desktop and GUI.
You should be able to run virsh as a non-root user (remember, it's always a good idea to run as few commands as root as possible). Under Debian you need to create a config file to make this work.
When logged in as user "nsrc", do the following to create a config file .config/libvirt/libvirt.conf in your home directory, containing one line:
$ cd
$ mkdir -p .config/libvirt     # it may already exist
$ editor .config/libvirt/libvirt.conf
uri_default = "qemu:///system"On the host server (either a terminal window or logged in using ssh), try the following commands:
$ virsh list
$ virsh list --all
The first shows only running VMs, the second shows all defined VMs (including halted ones).
You can send a shutdown signal like this:
$ virsh shutdown ubuntu1After a few seconds, try virsh list again to see if it has shut down. (If it hasn't - this means acpid is not running inside the guest)
To restart the VM:
$ virsh start ubuntu1You can find all the parameters of the VM, such as how much memory and CPU cores it has, and what disk images are attached, by looking at the XML:
$ virsh dumpxml ubuntu1 | lessSee if you can find the path to the disk image file in the XML.
(Hit space to advance to next page, 'b' to go back, and 'q' to quit)
The XML files are actually stored under /etc/libvirt/qemu/, but it is safer to manipulate them using the virsh commands, which test the XML file for errors before saving it.
On your host server, try connecting to the serial port of your VM:
$ virsh console ubuntu1Hit Enter a few times and you should find nothing happens. This is because the VM isn't configured to give a login prompt on the serial port. Hit ctrl and ] (right-hand square bracket) to exit.
Firstly, let's check that VM does have an emulated serial port, by editing the XML:
$ virsh edit ubuntu1Scroll down and check that it contains the following 6 lines:
    <serial type='pty'>
      <target port='0'/>
    </serial>
    <console type='pty'>
      <target type='serial' port='0'/>
    </console>
If it does, you can exit the editor without saving.
If not, then scroll down until you find the section defining the mouse:
<input type='mouse' bus='ps2'/>and insert the 6 lines of serial and console XML from above, before this line. Exit the editor, then reboot the virtual machine.
Now login to the virtual machine itself (using the graphical console as you have been doing so far). Create a file /etc/init/ttyS0.conf (as root) with the following contents:
start on stopped rc RUNLEVEL=[2345]
stop on runlevel [!2345]

respawn
exec /sbin/getty -L 115200 ttyS0 xterm
Once you have created this, you should be able to check the status of the console getty process and start it like this:
# initctl status ttyS0
# initctl start ttyS0
# initctl status ttyS0
Check that there is now a "getty" process running on ttyS0:
# ps auxwww | grep ttyS0Now go back to a command line on the host server. On there, type:
$ virsh console ubuntu1and then hit Enter. You should this time get a login prompt. Congratulations, you are now using the emulated serial port (which doesn't require any GUI to get into). Why use a serial console ? In case you lose network access to your virtual machine, and you cannot easily get access to the graphical desktop of your Host machine (if it is for example in a server room somewhere), then the virtual console will let you access your Linux server.
Login to test, then hit Ctrl and ] (right-hand square bracket) to disconnect from the emulated serial console.
Note: there's a way to make ttyS0 become an additional console to the graphical console. You do not need to do this now, but read on to find out.
This is done by editing /etc/default/grub, finding the line:
GRUB_CMDLINE_LINUX=""and replacing it with:
GRUB_CMDLINE_LINUX="console=tty1 console=ttyS0,115200"This tells the GRUB bootloader to boot the Linux kernel with TWO consoles:
Once this is done, you can rebuild the GRUB options file:
# grub-mkconfig -o /boot/grub/grub.cfg... and at next reboot, the virtual machine would use ttyS0 in addition to tty1 (the graphics VGA console).
Please feel free to try these if time is available, or use them as reference material.
Unfortunately, virt-manager can only run under Linux. However it is possible to create and access a remote Linux desktop so you can use virt-manager remotely.
Firstly, install the required package:
# apt-get install vnc4server(If you have not installed a desktop environment like LXDE, then you should also install a simple window manager like "openbox" or "fluxbox")
Now as the "nsrc" user - not as root! - type "vncserver" to start a server.
nsrc@hostX:~$ vncserver

You will require a password to access your desktops.

Password: <choose a password>
Verify: <enter the same password>

New 'hostX.ws.nsrc.org:1 (nsrc)' desktop is hostX.ws.nsrc.org:1

Creating default startup script /home/nsrc/.vnc/xstartup
Starting applications specified in /home/nsrc/.vnc/xstartup
Log file is /home/nsrc/.vnc/hostX.ws.nsrc.org:1.log
Note the VNC screen number, in the above example it is :1. (The actual TCP port number is this value plus 5900).
Now connect using a VNC client on your laptop to <yourhost>:<screen>, which would be hostX:1 in the above example. You should be prompted for the password.
If you just get a blank screen, then you are probably in the 'openbox' window manager. Right-click, select Terminal from the menu, and in the terminal type 'virt-manager'.
Note that you can disconnect and reconnect from the desktop with VNC, and it will be just as you left it.
If you want the VNC desktop to have the full LXDE desktop environment, you need to edit a config file, comment out a couple of lines and add a new line.
$ cd
$ editor .vnc/xstartup
...
#x-terminal-emulator -geometry 80x24+10+10 -ls -title "$VNCDESKTOP Desktop" &
#x-window-manager &
x-session-manager &
Now restart your VNC server:
$ vncserver -kill :1
$ vncserver
and reconnect.
Note 1: If you reboot your VM server, then you will have to login over ssh and type "vncserver" again to restart the VNC server. However it will remember the password you used before.
Note 2: This is not the way we recommend to manage Linux systems, for many reasons. However it does give you a usable way to run virt-manager over the network.
If you had a cluster of machines, you can run virt-manager on one machine, and then use File > Add Connection to get it to communicate with libvirt on other machines. Then only the manager machine needs to have a graphical desktop. 2
You can create 'storage pools' to make them available to libvirt. Here is how to set up an LVM pool. Do this as root. You can create the file "ganeti.xml" wherever you want. We'll create the file in the /root directory.
# cd
# editor ganeti.xml
<pool type="logical">
  <name>ganeti</name>
  <target>
    <path>/dev/ganeti</path>
  </target>
</pool>

# virsh pool-define ganeti.xml
# virsh pool-list --all
# virsh pool-start ganeti
# virsh pool-autostart ganeti
# virsh pool-list
Now you have the option of creating VMs within the "ganeti" pool, which will create logical volumes in that volume group.
The virt-install tool allows you to create and start a VM, allocate disk and attach CD image, without having to write XML and without having to use the virt-manager GUI.
This is very useful if you want to do all your management using virsh CLI.
# apt-get install virtinst
# virt-install --name foo --ram 256 \
   --cdrom /var/lib/libvirt/images/ubuntu-14.04.5-server-i386.iso \
   --disk pool=default,size=4 --network=bridge:br-lan \
   --noautoconsole --graphics vnc,listen=0.0.0.0,password=xyzzy
(Use pool=ganeti,size=4 if you have set up an LVM storage pool and want to use a logical volume rather than an image file)
With --noautoconsole it does not attempt to start the virt-viewer X11 application to attach to the console. Instead, you can use a VNC viewer on your laptop to connect to the console.
To find out which VNC port to connect to, type:
# virsh vncdisplay fooThis will return something like :0 or :2 which is the VNC display number. (Add 5900 to get the VNC TCP port number).
Start your VNC viewer, tell it to connect to hostX.ws.nsrc.org:<N> and you should have a password-protected graphical console onto the VM.
By default, virt-manager creates QCOW2 storage files.
If you want to create a different format, e.g. raw, or create an image in a different storage pool, this is what you do.
When creating a virtual machine, at step 4 of 5 ("Enable storage for this virtual machine") click "Select managed or other existing storage", then "Browse".
At this point you can select a storage pool from the left-hand pane and click New Volume. This allows you to choose a name for the volume and its format (e.g. raw) and size. Note that you cannot choose the format if you choose an LVM based storage pool - therefore choose the default pool to create a disk image in raw format.
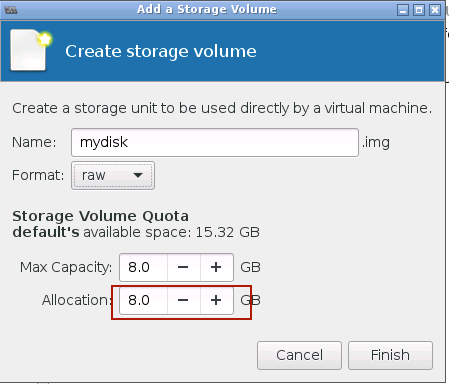
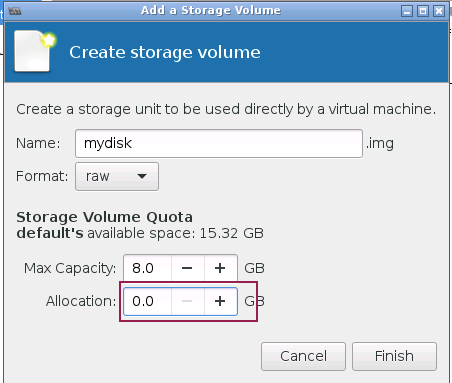
At this point you can decide if you want to allocate all space in the raw file, or if you want to create it sparse - this means that very little or no space will be used by the disk image until you start writing data to it, and then it will grow as required.
When the volume has been created, select it in the right-hand pane, then click "Choose Volume" to continue with the installation using this volume.
Snaphots are supported using the qcow2 format; the disk image file contains both the disk snapshots and the CPU/RAM state. You can try them out.
virt-manager GUI supports snapshots. To use them, click on the screen icon with the "Play" pictogram in the Virt-manager window for the VM:
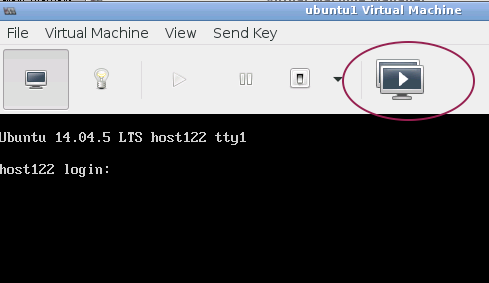
Once you click on the button, a dialog is brought up which should say "No snapshot selected" on the right side, and a + button at the lower left. Use this button to create a new snapshot. Give the snapshot a name ("before snapshot test", or whatever you like), then click "finish".
Once the snapshot is created (it may take a few seconds), you can log onto your VM and create a simple file in your home directory:
$ cd
$ touch somefile
$ ls -l somefile
Once you've created the file, go back to the Snapshots window, select the snapshot you created earlier, and click on the small "Play" icon at the bottom left (|>). You will be asked if you would like to run this snapshot (revert) - this will "kill" the running VM and roll back to the previous state. ANY WORK done after the snapshot will be lost!
If you want, you can also do this using the command line:
$ virsh snapshot-create <vmname>
$ virsh snapshot-list <vmname>
$ virsh snapshot-revert <vnmame> <snapshotID>
You can try creating temporary as before and watching how they change back when you revert a snapshot.
If a machine is shutdown, you can use snapshot-revert to start it immediately at the point where the snapshot was taken.