
[Main Page](../index.html "Main Page")
# Virtual Machines Exercise
The goal of this exercise is to start a virtual machine that will be used for the rest of our workshop. We need ten of you to be able to start the machine before we can proceed!
We'll use Windows or Macintosh binaries for VirtualBox 5.2, a free virtualisation engine from Oracle. VirtualBox's website is here: https://www.virtualbox.org/ Binaries are locally available for you to download here:
- [MacOS](../software/VirtualBox-5.2.12-122591-OSX.dmg)
- [Windows](../software/VirtualBox-5.2.12-122591-Win.exe)
Once you've downloaded and installed VirtualBox, we'd like you to install a Linux Virtual Machine that we'll use for network management. This is a Ubuntu instance of LibreNMS:
- [Linux Virtual Machine .ova for VirtualBox](../software/librenms_ubuntu_1604.ova)
You can find out more about the LibreNMS virtual machine here: (https://docs.librenms.org/#Installation/Ubuntu-image/)
Double-click the ".ova" file to launch it using VirtualBox, and you'll see a dialogue asking you to confirm some default settings. They probably look like this:

Make sure you uncheck:
- DVD **(uncheck this)**
- USB Controller **(uncheck this)**
- Sound Card **(uncheck this)**
**Also ensure you tick the box "Reinitialize the MAC address of all network cards".**
When you click "continue" on the menu, you'll be asked to agree or disagree to the terms of the GNU General Public License. Please "Agree"!
Once you've imported the Virtual Machine, edit the network controller so that your network communications will be bridged to your local network card.
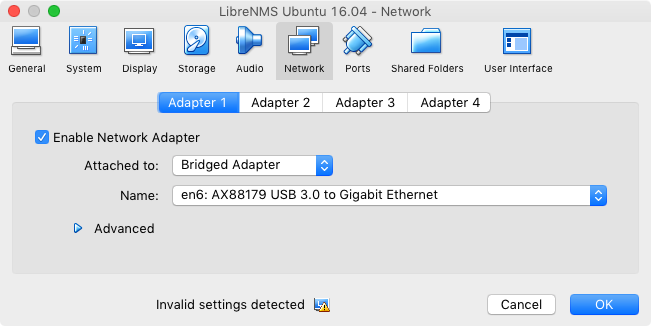
Next you need to click the "Advanced" arrow in the network dialogue so you can generate a new MAC address for your machine.

Click the button to the right of the MAC address to generate a new one. If your MAC address looks like the one in this documentation, you have not succeeded yet.
#### Starting Up
Now it's time to launch the virtual machine. If you're on a Mac, you might have an image that looks like this:
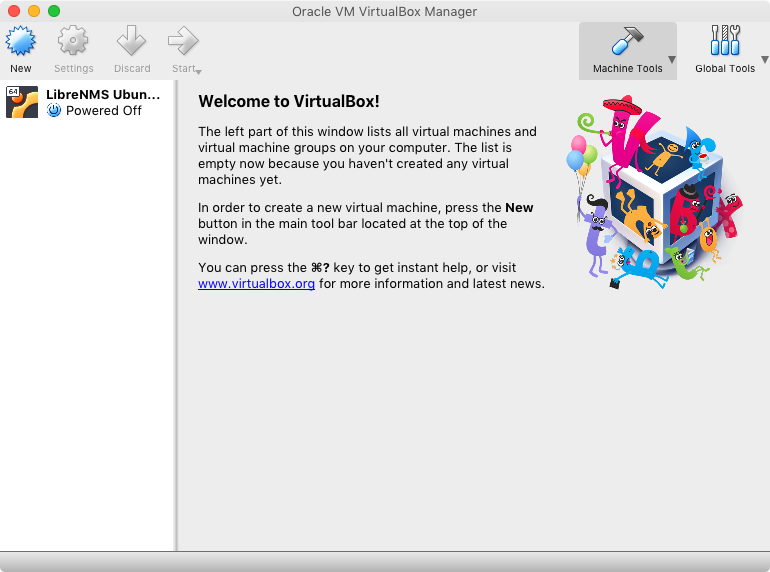
Click on the LibreNMS instance on the left, and click the "Start" arrow! Once the machine is on, you should have a window that looks like this:
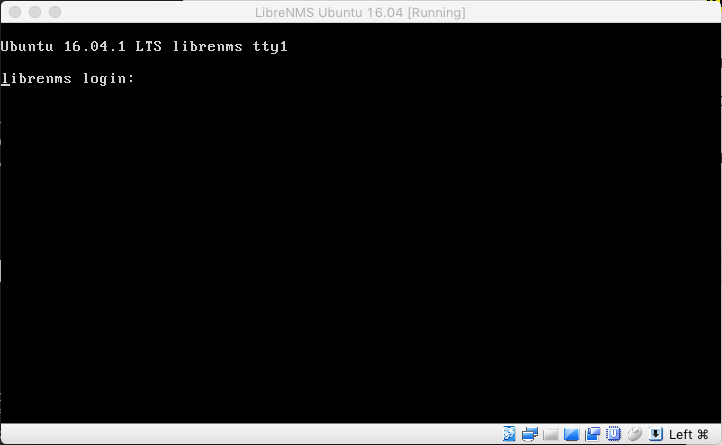
#### Credentials
Credentials for this image are:
> Please note the second character of the SSH password is a CAPITAL letter I (not a number one)
- username: librenms
- password: `CIne3fwdfds`
#### Setting Up
Working directly on the VirtualBox Console can be difficult. It's better to ssh to your machine if you can. Set up your VirtualBox networking so that your new Virtual Machine is briged to the local network in Machine:Network:Settings. You may need to restart networking before you will get a new IP address.
To find the IP address your new machine has received, enter:
```
ifconfig -a
```
Now ssh to your new machine with the credentials above. Once you've logged in, the first thing you should do is change your password:
```
passwd
```
After that, set up your virtual machine to use a local software mirror, so you can get ubuntu updates without going all the way to the Internet for them.
You can do this two ways. For the manual way, edit the apt-source file like this:
```
sudo nano /etc/apt/sources.list
```
In the file, take every instance of deb http (like this)...
```
deb http://gb.archive.ubuntu.com/ubuntu/ ...
```
And change the beginning, so it looks like this:
```
deb http://10.100.0.6:3142/gb.archive.ubuntu.com/ubuntu/ ...
```
Make sure to leave everything after the / alone!
In the file, take every instance of deb http (like this)...
```
deb http://security.ubuntu.com/ubuntu ...
```
And change the beginning, so it looks like this:
```
deb http://10.100.0.6:3142/security.ubuntu.com/ubuntu ...
```
Make sure to leave everything after the / alone!
**If you want to be clever and save yourself some work, try this instead to change all instances at once:**
```
sudo sed -i 's/http:\/\/gb.archive.ubuntu.com\/ubuntu\//http:\/\/10.100.0.6:3142\/gb.archive.ubuntu.com\/ubuntu\//g' /etc/apt/sources.list
sudo sed -i 's/http:\/\/security.ubuntu.com\/ubuntu/http:\/\/10.100.0.6:3142\/security.ubuntu.com\/ubuntu/g' /etc/apt/sources.list
```
Check your work (and update your apt-cache) like this:
```
sudo apt-get update
```
If sudo-apt-get update doesn't work, you've probably made a small error in your sources.list file.
Now upgrade the packages that are out of date with:
```
sudo apt-get upgrade
```
***When you are asked where to install Grub, choose /dev/sda***
***When you are asked about php.ini, keep the local version currently installed***
#### Disable IPv6
Some of the exercises we're doing in this lab can be broken by IPv6. For these exercises it's best to disable IPv6. From a root prompt (sudo bash) enter the following:
```
echo "net.ipv6.conf.all.disable_ipv6 = 1
net.ipv6.conf.default.disable_ipv6 = 1
net.ipv6.conf.lo.disable_ipv6 = 1" | sudo tee /etc/sysctl.d/99-my-disable-ipv6.conf
```
After you've made these changes, restart your system:
```
sudo reboot && exit
```
#### The Unifi Controller
Full instructions for installing the Unifi controller can be found here (https://help.ubnt.com/hc/en-us/articles/220066768-UniFi-How-to-Install-Update-via-APT-on-Debian-or-Ubuntu) but you should be able to do it with these short steps:
- Add a new apt source for the controller software
```
echo 'deb http://www.ubnt.com/downloads/unifi/debian stable ubiquiti' | sudo tee /etc/apt/sources.list.d/100-ubnt-unifi.list
```
- Add GPG keys so that Ubuntu trusts the new software source
```
sudo wget -O /etc/apt/trusted.gpg.d/unifi-repo.gpg https://dl.ubnt.com/unifi/unifi-repo.gpg
```
- Update your package cache, then install the software!
```
sudo apt-get update && sudo apt-get install mongodb
```
```
sudo apt-get install unifi
```
#### Success?
If you've done everything right, you should be able to connect to your Unifi controller on your virtual machine's IP address using https and port 8443. Good luck!