Working in pairs, you will build a Linux-based virtualization host server on hardware provided in the class.
NOTE: get into the habit of logging into the server as a normal user, and try to avoid logging in as "root". You will see a prompt which ends with $. It's advisable to disable logging in as root directly over SSH (not covered here).
If there is a single command you wish to run as root, prefix it with sudo. If you have a series of commands to run as root, start a root shell with sudo -s, and the prompt will change to #. When you have finished, type exit to leave the root shell.
Please feel free to try these if time is available, or use them as reference material.
Unfortunately, virt-manager can only run under Linux. However it is possible to create and access a remote Linux desktop so you can use virt-manager remotely.
Firstly, install the required package:
# apt-get install vnc4server(If you have not installed a desktop environment like LXDE, then you should also install a simple window manager like "openbox" or "fluxbox")
Now as the "nsrc" user - not as root! - type "vncserver" to start a server.
nsrc@hostX:~$ vncserver

You will require a password to access your desktops.

Password: <choose a password>
Verify: <enter the same password>

New 'hostX.ws.nsrc.org:1 (nsrc)' desktop is hostX.ws.nsrc.org:1

Creating default startup script /home/nsrc/.vnc/xstartup
Starting applications specified in /home/nsrc/.vnc/xstartup
Log file is /home/nsrc/.vnc/hostX.ws.nsrc.org:1.log
Note the VNC screen number, in the above example it is :1. (The actual TCP port number is this value plus 5900).
Now connect using a VNC client on your laptop to <yourhost>:<screen>, which would be hostX:1 in the above example. You should be prompted for the password.
If you just get a blank screen, then you are probably in the 'openbox' window manager. Right-click, select Terminal from the menu, and in the terminal type 'virt-manager'.
Note that you can disconnect and reconnect from the desktop with VNC, and it will be just as you left it.
If you want the VNC desktop to have the full LXDE desktop environment, you need to edit a config file, comment out a couple of lines and add a new line.
$ cd
$ editor .vnc/xstartup
...
#x-terminal-emulator -geometry 80x24+10+10 -ls -title "$VNCDESKTOP Desktop" &
#x-window-manager &
x-session-manager &
Now restart your VNC server:
$ vncserver -kill :1
$ vncserver
and reconnect.
Note 1: If you reboot your VM server, then you will have to login over ssh and type "vncserver" again to restart the VNC server. However it will remember the password you used before.
Note 2: This is not the way we recommend to manage Linux systems, for many reasons. However it does give you a usable way to run virt-manager over the network.
If you had a cluster of machines, you can run virt-manager on one machine, and then use File > Add Connection to get it to communicate with libvirt on other machines. Then only the manager machine needs to have a graphical desktop. 1
You can create 'storage pools' to make them available to libvirt. Here is how to set up an LVM pool. Do this as root. You can create the file "ganeti.xml" wherever you want. We'll create the file in the /root directory.
# cd
# editor ganeti.xml
<pool type="logical">
  <name>ganeti</name>
  <target>
    <path>/dev/ganeti</path>
  </target>
</pool>

# virsh pool-define ganeti.xml
# virsh pool-list --all
# virsh pool-start ganeti
# virsh pool-autostart ganeti
# virsh pool-list
Now you have the option of creating VMs within the "ganeti" pool, which will create logical volumes in that volume group.
The virt-install tool allows you to create and start a VM, allocate disk and attach CD image, without having to write XML and without having to use the virt-manager GUI.
This is very useful if you want to do all your management using virsh CLI.
# apt-get install virtinst
# virt-install --name foo --ram 512 \
   --cdrom /var/lib/libvirt/images/ubuntu-18.04.3-server-amd64.iso \
   --disk pool=default,size=4 --network=bridge:br-lan \
   --noautoconsole --graphics vnc,listen=0.0.0.0,password=xyzzy
(Use pool=ganeti,size=4 if you have set up an LVM storage pool and want to use a logical volume rather than an image file)
With --noautoconsole it does not attempt to start the virt-viewer X11 application to attach to the console. Instead, you can use a VNC viewer on your laptop to connect to the console.
To find out which VNC port to connect to, type:
# virsh vncdisplay fooThis will return something like :0 or :2 which is the VNC display number. (Add 5900 to get the VNC TCP port number).
Start your VNC viewer, tell it to connect to hostX.ws.nsrc.org:<N> and you should have a password-protected graphical console onto the VM.
On your host server, try connecting to the serial port of your VM:
$ virsh console ubuntu1Hit Enter a few times and you should find nothing happens. This is because the VM isn't configured to give a login prompt on the serial port. Hit ctrl and ] (right-hand square bracket) to exit.
Firstly, let's check that VM does have an emulated serial port, by editing the XML:
$ virsh edit ubuntu1Scroll down and check that it contains the following 6 lines:
    <serial type='pty'>
      <target type='isa-serial' port='0'/>
        <model name='isa-serial'/>
    </serial>
    <console type='pty'>
      <target type='serial' port='0'/>
    </console>
If it does, you can exit the editor without saving.
If not, then scroll down until you find the section defining the mouse:
<input type='mouse' bus='ps2'/>and insert the 6 lines of serial and console XML from above, before this line. Exit the editor, then reboot the virtual machine.
Now login to the virtual machine itself (using the graphical console as you have been doing so far).
To enable the serial console, we need to tell systemd to enable a getty service on the serial port:
# systemctl enable serial-getty@ttyS0.serviceIt should say:
Created symlink /etc/systemd/system/getty.target.wants/serial-getty@ttyS0.service → /lib/systemd/system/serial-getty@.service.Now, start the service:
# systemctl start serial-getty@ttyS0.serviceCheck that there is now a "getty" process running on ttyS0:
# ps auxwww | grep ttyS0Now go back to a command line on the host server. On there, type:
$ virsh console ubuntu1and then hit Enter. You should this time get a login prompt. Congratulations, you are now using the emulated serial port (which doesn't require any GUI to get into). Why use a serial console ? In case you lose network access to your virtual machine, and you cannot easily get access to the graphical desktop of your Host machine (if it is for example in a server room somewhere), then the virtual console will let you access your Linux server.
Login to test, then hit Ctrl and ] (right-hand square bracket) to disconnect from the emulated serial console.
Note: there's a way to make ttyS0 become an additional console to the graphical console. You do not need to do this now, but read on to find out.
This is done by editing /etc/default/grub, finding the line:
GRUB_CMDLINE_LINUX=""and replacing it with:
GRUB_CMDLINE_LINUX="console=tty1 console=ttyS0,115200"This tells the GRUB bootloader to boot the Linux kernel with TWO consoles:
Once this is done, you can rebuild the GRUB options file:
# grub-mkconfig -o /boot/grub/grub.cfg... and at next reboot, the virtual machine would use ttyS0 in addition to tty1 (the graphics VGA console).
By default, virt-manager creates QCOW2 storage files.
If you want to create a different format, e.g. raw, or create an image in a different storage pool, this is what you do.
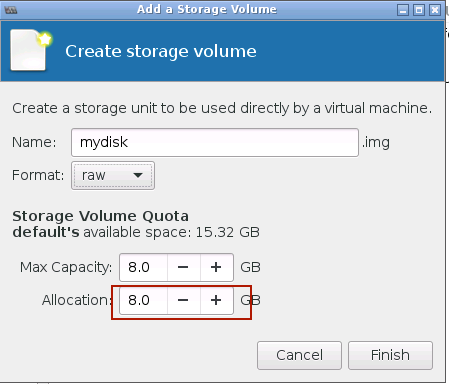
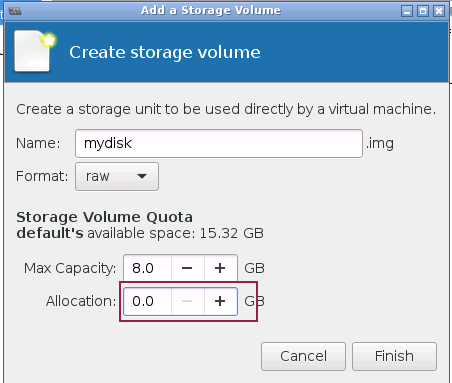
When creating a virtual machine, at step 4 of 5 ("Enable storage for this virtual machine") click "Select managed or other existing storage", then "Browse".
At this point you can select a storage pool from the left-hand pane and click New Volume. This allows you to choose a name for the volume and its format (e.g. raw) and size. Note that you cannot choose the format if you choose an LVM based storage pool - therefore choose the default pool to create a disk image in raw format.
At this point you can decide if you want to allocate all space in the raw file, or if you want to create it sparse - this means that very little or no space will be used by the disk image until you start writing data to it, and then it will grow as required.
When the volume has been created, select it in the right-hand pane, then click "Choose Volume" to continue with the installation using this volume.
Snaphots are supported using the qcow2 format; the disk image file contains both the disk snapshots and the CPU/RAM state. You can try them out.
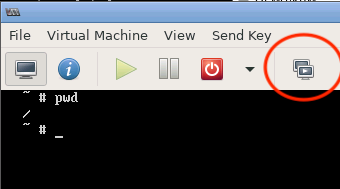
virt-manager GUI supports snapshots. To use them, click on the screen icon with the "Play" pictogram in the Virt-manager window for the VM:
Once you click on the button, a dialog is brought up which should say "No snapshot selected" on the right side, and a + button at the lower left. Use this button to create a new snapshot. Give the snapshot a name ("before snapshot test", or whatever you like), then click "finish".
Once the snapshot is created (it may take a few seconds), you can log onto your VM and create a simple file in your home directory:
$ cd
$ touch somefile
$ ls -l somefile
Once you've created the file, go back to the Snapshots window, select the snapshot you created earlier, and click on the small "Play" icon at the bottom left (|>). You will be asked if you would like to run this snapshot (revert) - this will "kill" the running VM and roll back to the previous state. ANY WORK done after the snapshot will be lost!
If you want, you can also do this using the command line:
$ virsh snapshot-create <vmname>
$ virsh snapshot-list <vmname>
$ virsh snapshot-revert <vnmame> <snapshotID>
You can try creating temporary as before and watching how they change back when you revert a snapshot.
If a machine is shutdown, you can use snapshot-revert to start it immediately at the point where the snapshot was taken.