This lab demonstrates how to install the NLNET Labs Routinator Validator Cache in preparation for ultimately running route origin validation on our lab network.
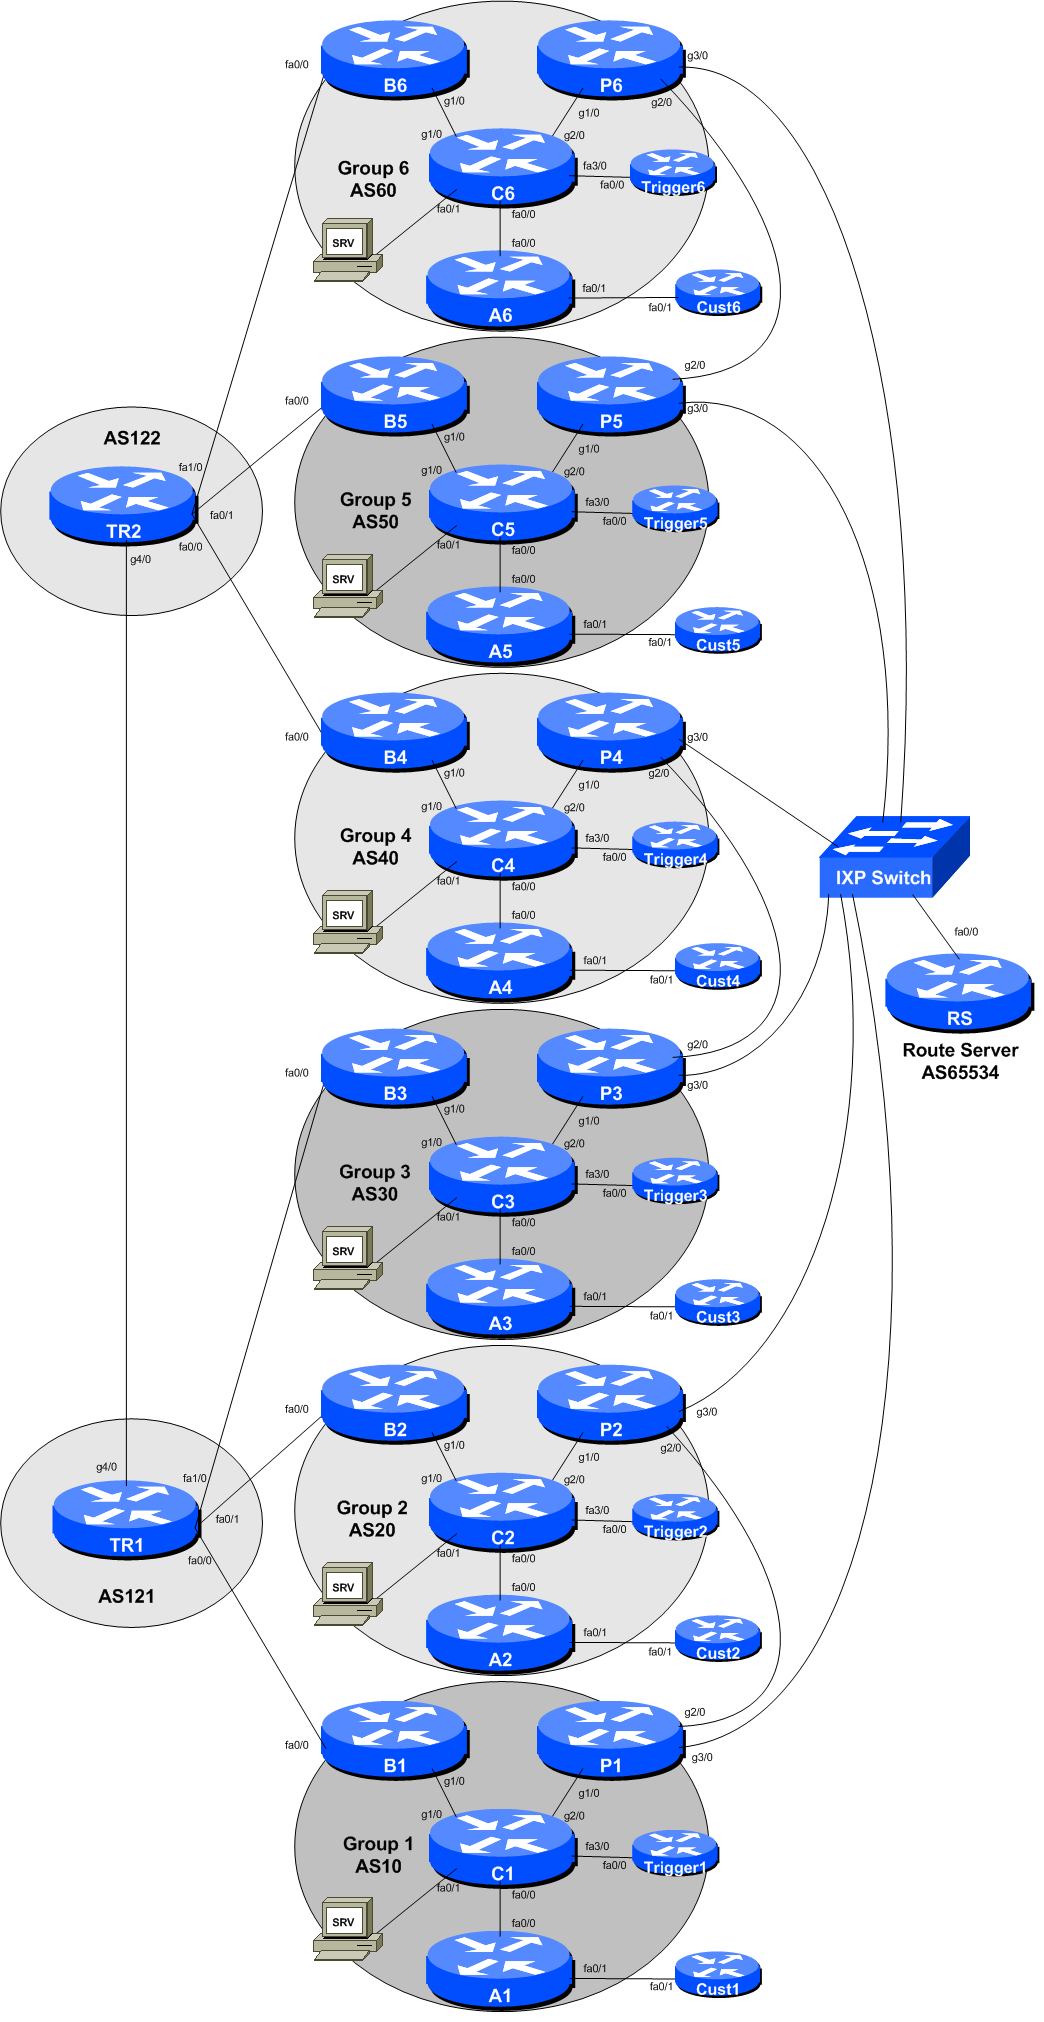
The diagram below is a reminder of the lab topology:
These instructions are borrowed from NLnetLabs excellent page describing how to install Routinator. Always consult NLnetLabs latest instructions before starting off in this set up.
We will be installing routinator on the SRV appliance provided for your group. This is a virtual machine running on the training VTP and is called srv1.groupX.ws.nsrc.org.
To start off, log in to the SRV appliance using the rpki username. The password will be provided by the workshop instructors. Routinator runs in standard user-land - no root capabilities are required, which is a very good thing. We will install routinator in the rpki’s home directory for this workshop1.
Routinator is built using the Rust language, so our first step is to install that:
rpki@srv$ cd
rpki@srv$ curl https://sh.rustup.rs -sSf | shNote: installing the Rust language is a 160Mbytes download. With 6 Groups in the workshop, this will take some time, so please be patient - dynamips is only capable of pushing packets at around 10Mbps. The download takes around 2 minutes with 10Mbps Internet access.
If we need to update Rust at a future point, we simply run rustup update at the command prompt.
At the end of the Rust install, you will probably see something like this:
To get started you need Cargo's bin directory ($HOME/.cargo/bin) in your PATH
environment variable. Next time you log in this will be done automatically.

To configure your current shell run source $HOME/.cargo/env
You need to run that source command mentioned at the end of the Rust install:
rpki@srv$ source $HOME/.cargo/envAnd now you are set, and ready to download and install routinator from NLnetLabs GIT repo, like this:
rpki@srv$ cargo install --git https://github.com/NLnetLabs/routinator.gitAs with Rust, this is quite a significant download (taking about 3 minutes transiting the Dynamips hosted class network), so will take around 10 minutes if all 6 Groups are running the download at the same time.
If we need to update routinator at a future point, we simply rerun the above command with the -f option included, like this:
rpki@srv$ cargo install -f --git https://github.com/NLnetLabs/routinator.gitwhich will then overwrite the existing installation. Note the instructions if any syntax has changed at any point.
Once routinator has been built we can now set about configuring it. The first thing we need to do is get all the TAL files from the Certificate Authorities. To do this, we run:
rpki@srv$ routinator initwhich sets up the rpki cache directory and the TAL directory, by default under .rpki-cache/repositry and .rpki-cache/tals under the current home directory. The TALs from the 5 Regional Internet Registries are provided as part of the distribution, but the ARIN TAL requires each user to agree to their Relying Party Agreement - the initialisation will display this:
Before we can install the ARIN TAL, you must have read
and agree to the ARIN Relying Party Agreement (RPA).
It is available at

https://www.arin.net/resources/manage/rpki/rpa.pdf

If you agree to the RPA, please run the command
again with the --accept-arin-rpa option.
Click on the link and read the ARIN RPA. Then we re-run the initialisation like this:
rpki@srv$ routinator init --accept-arin-rpaand the output should display something like this:
Created local repository directory $HOME/.rpki-cache/repository
Installed 5 TALs in $HOME/.rpki-cache/tals
To download ARIN’s TAL, run this command:
rpki@srv$ curl https://www.arin.net/resources/manage/rpki/arin-rfc7730.tal > ~/.rpki-cache/tals/arin.talARIN’s TAL should now be in place, and routinator will run properly.
Note Well: Please do verify these instructions by following what the routinator initialisation process recommends - don’t just copy the notes here!
The
routinator
can run in two modes:
It can print the Validated ROA Payload (VRP), basically a list of all the validated prefixes. When this option is run, routinator will rsync the latest RPKI repository to you SRV appliance - this can take a while, the instructors will advise what to do
It can run in server mode, providing validation information to routers configured to talk to it.
Before we start the server running, we need to create a configuration file. The default file is called .routinator.conf in the home directory. Let’s create it:
rpki@srv$ editor ~/.routinator.confand put the following into the file (remembering to replace X in the addresses with your group number):
# Routinator Configuration
#
repository-dir = ".rpki-cache/repository"
tal-dir = ".rpki-cache/tals"
rsync-args = ["-4"]
rtr-listen = ["127.0.0.1:3323", "[::1]:3323", "100.68.X.30:3323", "[2001:DB8:X:21::1]:3323"]
#
Some explanation of the options:
The repository-dir and tal-dir entries are the default values routinator expects for where the VRPs and the TALs are kept. routinator won’t run without these being set.
Restrict routinator to using rsync over IPv4 from our lab network
The rtr-listen entry has routinator listening to all connections made to it over IPv4 and IPv6 to its loopback address (to allow for testing) and its ethernet LAN address, sufficient for our needs in our lab.
Save the configuration file and then set the permission of the file such that it is read/write by the owner only:
rpki@srv$ chmod 644 .routinator.confFinally we are now ready to run routinator.
First of all we will rsync the latest RPKI repository to the SRV appliance - this will take a while, especially on the Dynamips lab environment. To do this we run the command:
rpki@srv$ routinator -v vrpsYou will see various messages appear in screen, similar to:
rsyncing from rsync://rpki.arin.net/repository/.
rsyncing from rsync://ca.rg.net/rpki/.
rsyncing from rsync://rpki.cnnic.cn/rpki/.
rsyncing from rsync://repository.lacnic.net/rpki/.
rsyncing from rsync://rpki.ripe.net/repository/.
rsyncing from rsync://rpki.apnic.net/repository/.
rsyncing from rsync://rpki.afrinic.net/repository/.
rsyncing from rsync://rpkica.twnic.tw/rpki/.
rsyncing from rsync://rpki-repository.nic.ad.jp/ap/.
Summary:
lacnic: 2418 valid ROAs, 7004 VRPs.
apnic: 3114 valid ROAs, 21461 VRPs.
afrinic: 335 valid ROAs, 492 VRPs.
arin: 4934 valid ROAs, 6529 VRPs.
ripe: 10576 valid ROAs, 56237 VRPs.
ASN,IP Prefix,Max Length,Trust Anchor
...
followed by printing every single VRP there is - the listing will take a while - before the command prompt is returned. Note that as well as the 5 RIRs, we also have data from RG.net, JPNIC, TWNIC and CNNIC. Omitting the -v option will drop the rsyncing output displayed while the initial sync is being carried out.
Note: Once you have started this command running, it might be a good idea to have a refreshment break. With 6 Groups building routinator at the same time, it takes around 15 to 20 minutes to sync the VRPS (around 360Mbytes worth) assuming a 10Mbps 2 Internet connection.
We are now ready to run the routinator server for our routers.
At the command prompt, just do:
rpki@srv$ routinator server -dThis will start routinator and detach the console from it - so it carries on running in the background. To stop it running, if you want to in future, look for the process-id and kill that.
Now trying using telnet to connect to port 3323 on the SRV appliance. You should get a connection being offered. Routinator is now ready to do its thing! For example:
rpki@srv$ telnet localhost 3323
Trying ::1...
Connected to localhost.
Escape character is '^]'.

telnet> q
Connection closed.
The routinator is now ready to use in the upcoming labs.
Note: NLnetLabs do not yet provide an initscript or systemd script to have routinator start on boot. With the ongoing development of the code, it is likely this will materialise soon. If you are interested in one for your own deployment in your own network, consult the Appendix at the end of this lab.
Check that routinator is running properly:
rpki@srv$ ps aux | grep routinator
rpki     13585  2.4  1.9 100388 80092 ?        Ssl  11:28   0:12 /home/rpki/.cargo/bin/routinator --config=/home/rpki/.routinator.conf server
And check that it is listening for connections too:
rpki@srv$ netstat -a | grep 3323
tcp        0      0 100.68.X.30:3323        *:*                     LISTEN
tcp6       0      0 2001:DB8:X:13::1:3323   [::]:*                  LISTEN
(note that the lab notes have X inserted instead of the actual address)
We are now ready to move on. Please show the lab instructors your working routinator configuration and the output of the diagnostic commands above.
No promises are made about whether this will work on anything else, but here is an initscript that is suitable for Ubuntu 14.04 LTS that these labs were developed on. It should still work for other versions of Ubuntu (confirmed on 16.04 LTS), as long as they support /etc/init.d concept of starting system apps.
The following is the initscript which should be placed in the /etc/init.d folder, as root user, with execute permissions by all (chmod 755). The file should be called routinator. Note that routinator runs as the user rpki in this example. Please do not run it as root, NLnetLabs point out there is no requirement for root privileges as the routinator server listens on a high TCP port.
#!/bin/sh
#
# /etc/init.d/routinator
#
### BEGIN INIT INFO
# Provides:          routinator
# Required-Start:    $network $remote_fs
# Required-Stop:     $network $remote_fs
# Default-Start:     2 3 4 5
# Default-Stop:      0 1 6
# Short-Description: Start or stop the routinator RPKI validator cache
# Description:       Routinator is an RPKI validator cache, regular
#                    fetching route origin authorization information
#                    from the configured public CAs. Routers in the
#                    network connect to this validator cache.
### END INIT INFO
#

set -e

# Source LSB init functions
. /lib/lsb/init-functions

DAEMON=/home/rpki/.cargo/bin/routinator
NAME=routinator
DESC="RPKI validator cache"
PIDFILE=/var/run/routinator/$NAME.pid
DAEMON_USER=rpki
DEFAULTS=/etc/default/routinator
DAEMON_ARGS="server -d"

# Check whether the binary is still present:
test -f "$DAEMON" || exit 0

case "$1" in
    start)
        log_daemon_msg "Starting $DESC" $NAME
        set +e
        pidofproc "$DAEMON" > /dev/null
        STATUS=$?
        set -e
        if [ "$STATUS" = 0 ]
        then
            log_progress_msg "already running"
            log_end_msg $STATUS
            exit $STATUS
        fi

        set +e
        start-stop-daemon --start --quiet --exec $DAEMON --oknodo --chuid $DAEMON_USER --pidfile $PIDFILE -- $DAEMON_ARGS | logger -p daemon.notice -t $NAME
        STATUS=$?
        set -e

        log_end_msg $STATUS
        exit $STATUS
        ;;

    stop)
        log_daemon_msg "Shutting down $DESC" $NAME

        set +e
        start-stop-daemon --oknodo --stop --retry 3 --quiet --pidfile /var/run/routinator/$NAME.pid --signal 15
        STATUS=$?
        set -e

        log_end_msg $STATUS
        exit $STATUS
        ;;

    restart)
        # Restart service (if running) or start service
        $0 stop
        $0 start
        ;;

    status)
        log_daemon_msg "Checking $DESC status" $NAME
        # Use pidofproc to check the status of the service,
        # pidofproc returns the exit status code of 0 when it the process is
        # running.

        # LSB defined exit status codes for status:
        # 0    program is running or service is OK
        # 1    program is dead and /var/run pid file exists
        # 2    program is dead and /var/lock lock file exists
        # 3    program is not running
        # 4    program or service status is unknown
        # 5-199    reserved (5-99 LSB, 100-149 distribution, 150-199 applications)

        set +e
        pidofproc "$DAEMON" > /dev/null
        STATUS=$?
        log_progress_msg "(status $STATUS)"
        log_end_msg 0
        set -e
        exit $STATUS
        ;;

    *)
        echo "Usage: $0 {start|stop|status|restart}"
        exit 1
        ;;
esac
Once the script is in place, we need to set up the appropriate boot time links:
srv$ sudo update-rc.d routinator defaultswhich will produce output like this:
 Adding system startup for /etc/init.d/routinator ...
   /etc/rc0.d/K20routinator -> ../init.d/routinator
   /etc/rc1.d/K20routinator -> ../init.d/routinator
   /etc/rc6.d/K20routinator -> ../init.d/routinator
   /etc/rc2.d/S20routinator -> ../init.d/routinator
   /etc/rc3.d/S20routinator -> ../init.d/routinator
   /etc/rc4.d/S20routinator -> ../init.d/routinator
   /etc/rc5.d/S20routinator -> ../init.d/routinator
Which should be sufficient for routinator to be started and stopped at boot and shutdown time respectively.
Here is a systemd script developed by University of Oregon’s RouteViews project team to start up routinator on a CentOS7 system. It is also confirmed to work on Ubuntu 16.04 and should work on other operating systems using systemd.
This assumes that the administrator has set up a user called rpki, created a folder /usr/local/routinator to place the whole routinator set up in and given ownership to the user rpki. Adjust to suit. Note, from experience, it is best to let the NLnetLabs install do its thing in rpki user’s home directory, and once successfully run, move the entire tree to the /usr/local/routinator structure.
Place the following configuration in a file called /lib/systemd/system/routinator.service using your favourite editor.
[Unit]
Description=Routinator 3000
Documentation=man:routinator(1)
After=network.target

[Service]
ExecStart=/usr/local/routinator/.cargo/bin/routinator --config=/etc/routinator/routinator.conf server
PIDFile=/var/run/routinator/pid
Type=simple
RestartSec=0
User=rpki

[Install]
WantedBy=multi-user.target
Next we create a configuration file in /etc/routinator folder. As the lab text notes, the configuration might look like this:
# Routinator Configuration
#
repository-dir = "/usr/local/routinator/.rpki-cache/repository"
tal-dir = "/usr/local/routinator/.rpki-cache/tals"
rsync-args = ["-4"]
rtr-listen = ["ipv4-address:3323", "[ipv6-address]:3323"]
#
Adjust to suit.
We now need to prepare systemd so that routinator will run on boot time. First we get systemd to reload all its configuration generators (see the man page for systemd for full explanation):
srv# systemctl daemon-reloadThen we enable routinator within systemd:
srv# systemctl enable routinatorThe Linux system will respond with:
Created symlink from /etc/systemd/system/multi-user.target.wants/routinator.service to /lib/systemd/system/routinator.service.And then we start it running:
srv# systemctl start routinatorAnd once the prompt returns, we can check on its status:
srv# systemctl status routinatorwhich will produce output like:
● routinator.service - Routinator 3000
   Loaded: loaded (/lib/systemd/system/routinator.service; enabled; vendor preset: enabl
   Active: active (running) since Sun 2019-07-14 11:00:31 +06; 8s ago
     Docs: man:routinator(1)
 Main PID: 13462 (routinator)
    Tasks: 3
   Memory: 476.6M
      CPU: 77ms
   CGroup: /system.slice/routinator.service
           ├─13462 /usr/local/routinator/.cargo/bin/routinator --config=/etc/routinator/
           └─13469 rsync -4 -rltz --delete rsync://rpki.arin.net/repository/ /usr/local/

Jul 14 11:00:31 rpki systemd[1]: Started Routinator 3000.
Check that it is now running:
srv# ps aux | grep routinator
rpki     13462  5.5  1.9 100388 79976 ?        Ssl  11:00   0:10 /usr/local/routinator/.cargo/bin/routinator --config=/etc/routinator/routinator.conf server
You may also see rsync’s running as routinator updates its local caches. Once this is all finished, routinator will start listening on port 3323 as we defined in the configuration file.