This lab demonstrates how to install the NLNET Labs Routinator 3000 Validator Cache in preparation for ultimately running route origin validation on our lab network.
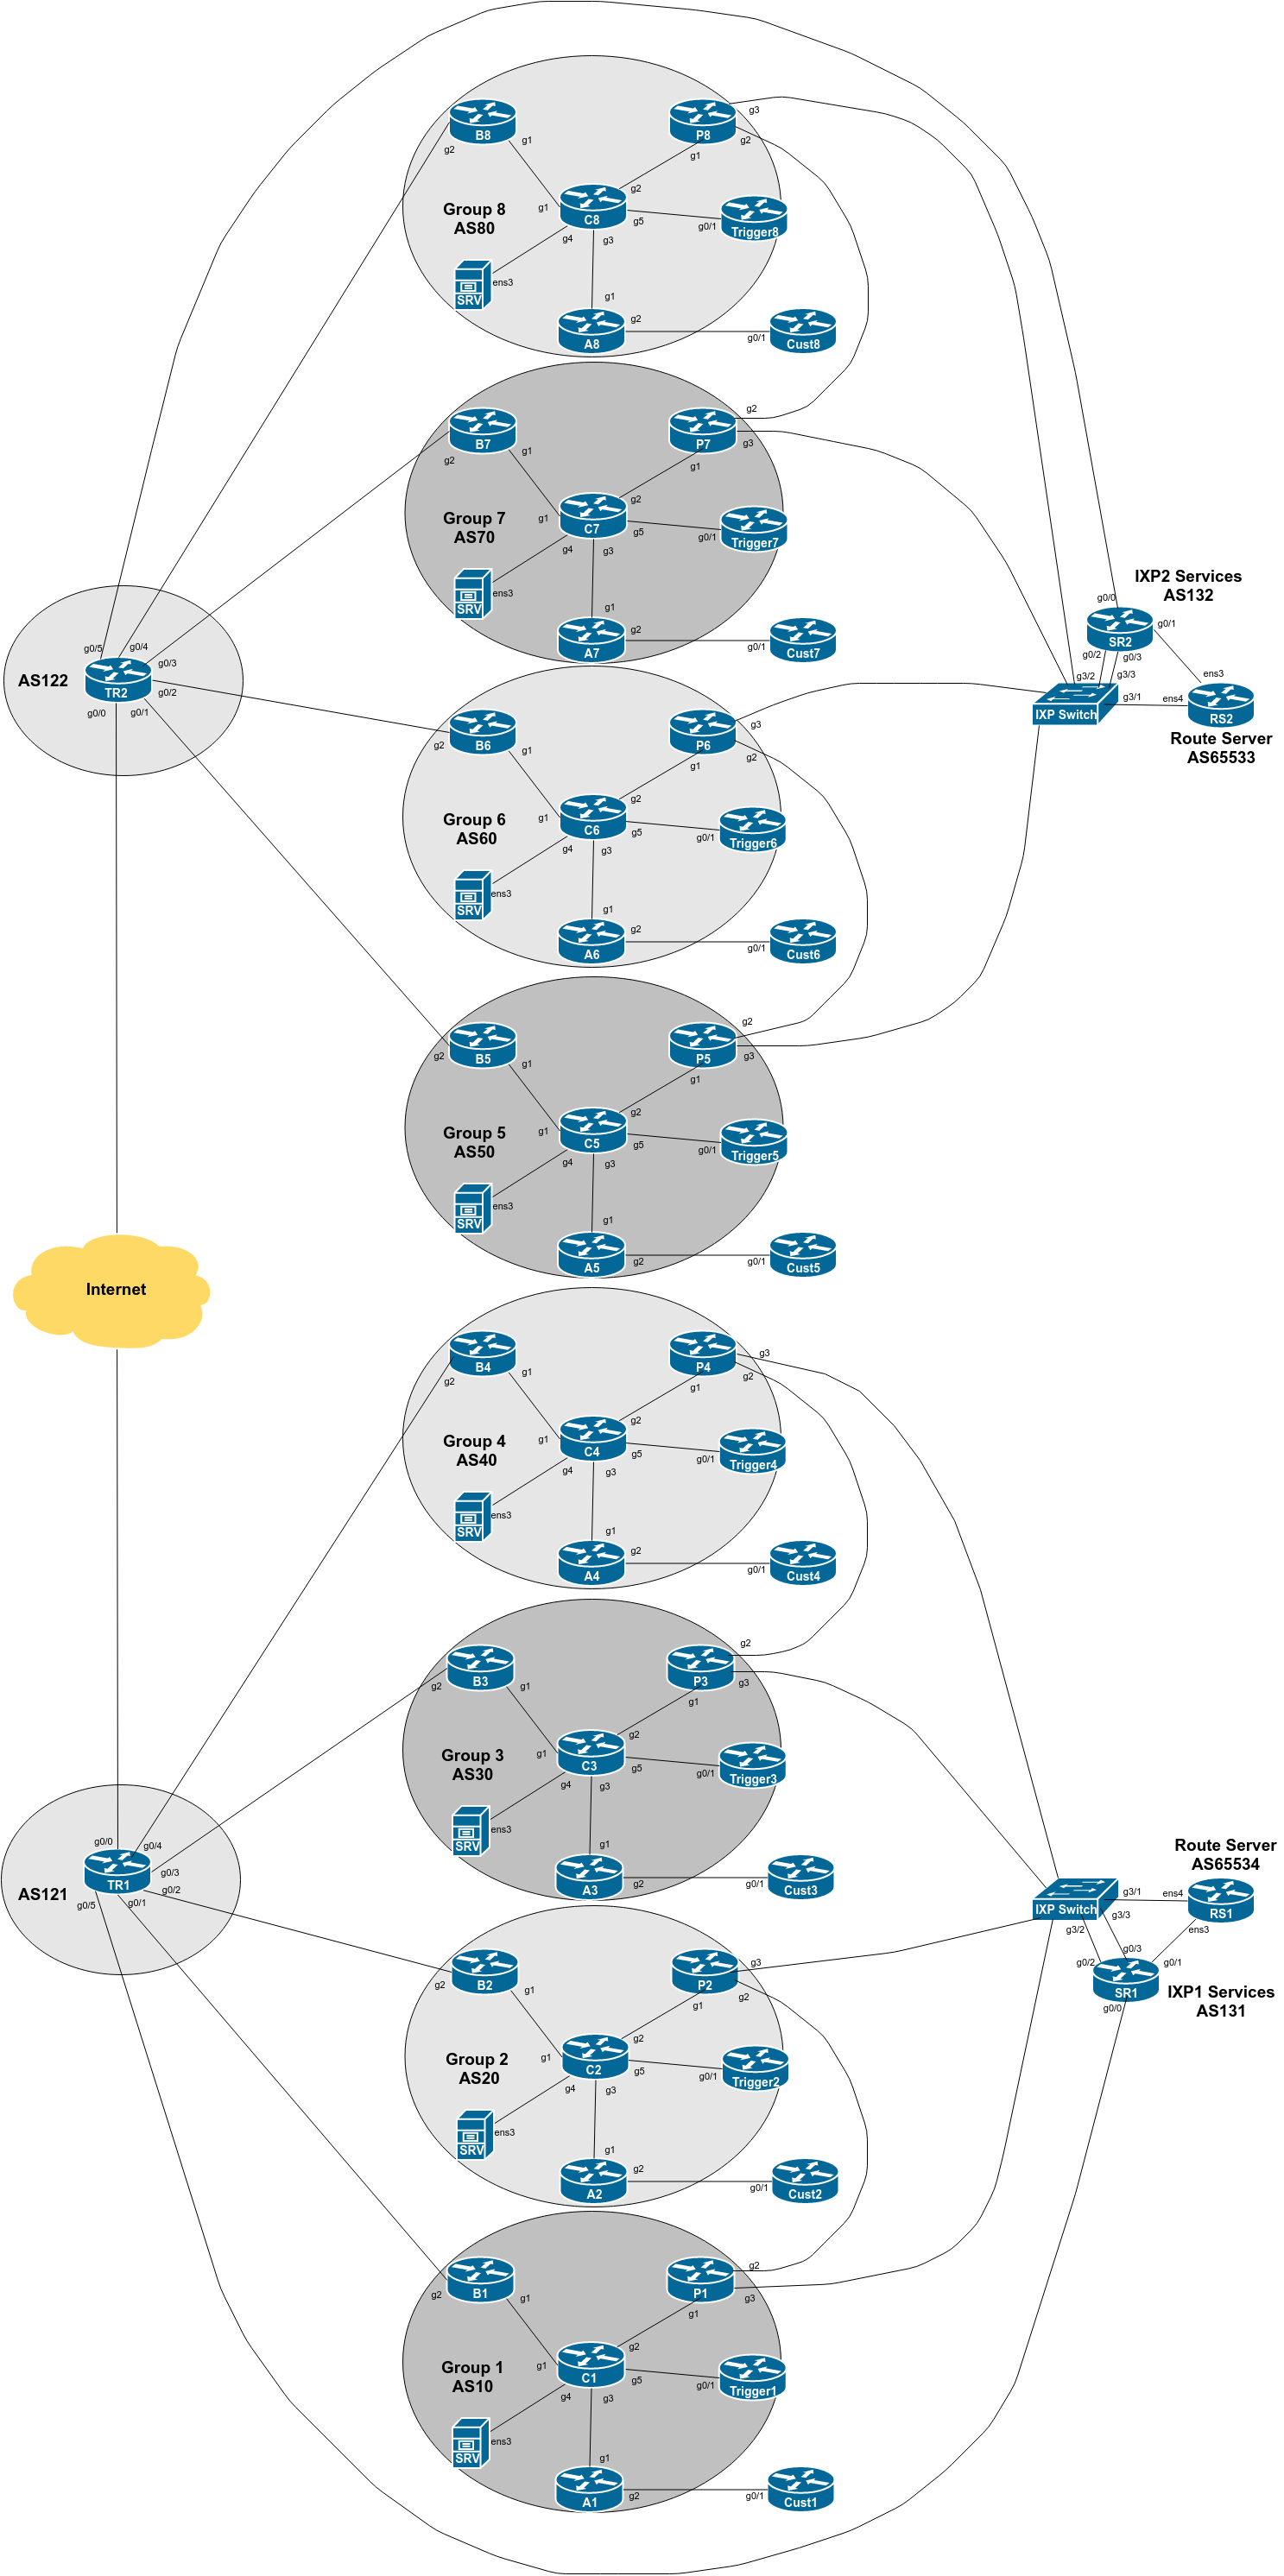
The diagram below is a reminder of the lab topology:
These instructions are borrowed from NLnetLabs excellent page describing how to install Routinator. Always consult NLnetLabs latest instructions before starting off in this set up.
We will be installing Routinator on the SRV appliance provided for your group. This is a virtual machine running on the training VTP and is called srvX.groupX.ws.nsrc.org.
To start off, log in to the SRV appliance on its console using the isplab username. The password will be provided by the workshop instructors.
The GNS3 based lab infrastructure using Cisco’s IOSv and CSR1000v is limited to 1Mbps, as it is intended for investigation of routing concepts, not moving packets for production. If we tried to install Routinator over a 1Mbps link, it would take around 3 hours from start to finish. This isn’t practical for our lab schedule.
The SRV appliance has a second ethernet interface which connects it directly to the lab infrastructure - its a “backdoor” to make the operation of our lab more efficient.
Let’s disable the interface connecting to the Core router first:
srvX$ sudo ip link set ens3 downand then point the default route on the SRV appliance to the “backdoor” interface:
srvX$ sudo ip route add default via 100.64.0.1Check the routing table now. It should look like this:
srvX$ ip route
default via 100.64.0.1 dev ens4
100.64.0.0/22 dev ens4 proto kernel scope link src 100.64.0.X0
First lets make sure the repository on the lab server is up to date:
srvX$ sudo apt update
srvX$ sudo apt -y upgrade
and that will bring all installed packages up to the current versions.
Once you have done this, check that the server is still using the “backdoor” path using the ip route command introduced in the previous section. If you find that ens3 has returned because of the package update steps, then rerun the commands to shut the interface down, and have the static default route pointing to the “backdoor”.
Confirm that ip route shows the following:
srvX$ ip route
default via 100.64.0.1 dev ens4
100.64.0.0/22 dev ens4 proto kernel scope link src 100.64.0.X0
We then make sure we have the gnupg2 package installed (it might already be there):
srvX$ sudo apt install -y gnupg2
Routinator is conveniently provided by NLnetLabs as a Debian/Ubuntu package. Using their instructions, reproduced here, it is very simple to install Routinator on your lab server.
Check the version of Ubuntu running on the lab server. At time of writing, it is 18.04, otherwise known by the codename Bionic. To verify, run this command:
srvX$ lsb_release -a
No LSB modules are available.
Distributor ID: Ubuntu
Description:    Ubuntu 20.04.3 LTS
Release:        20.04
Codename:       focal
Now we are going to update the apt source list to include Routinator:
srvX$ cd /etc/apt/sources.list.d
srvX$ sudo editor routinator.list
and add the following single line:
deb [arch=amd64] https://packages.nlnetlabs.nl/linux/ubuntu/ focal mainBe careful with spelling and note the spaces too!
Save the new file and then run:
srvX$ wget -qO- https://packages.nlnetlabs.nl/aptkey.asc | sudo apt-key add -which will get the public key that is used to verify the signature of the package (to verify its authenticity). After that we can then run the update again to get information about the Routinator package.
We also need to make sure that the apt configuration will allow connections to sources which use https rather than http:
srvX$ cd /etc/apt/apt.conf.d
srvX$ sudo editor 99proxy
and make it look like this (the first line will already exist):
Acquire::http::Proxy "http://100.64.0.1:3142/";
Acquire::https::Proxy "DIRECT";
Now run the update again, and apt will get the package list from NLnetLabs as well.
srvX$ sudo apt updateYou will see a query to NLnetLabs being made in the output, like this:
srvX$ sudo apt update
...
Get:6 https://packages.nlnetlabs.nl/linux/ubuntu focal InRelease [4323 B]
Get:7 https://packages.nlnetlabs.nl/linux/ubuntu focal/main amd64 Packages [5325 B]
Fetched 9648 B in 1s (7858 B/s)
Reading package lists... Done
Building dependency tree
Reading state information... Done
All packages are up to date.
We are now ready to install Routinator.
To install Routinator, run:
srvX$ sudo apt install routinatorYou will see the package download and new routinator user and group being created, and so on.
Once Routinator has been installed we can configure it. The first thing we need to do is get all the TAL files from the Certificate Authorities. To do this, we run:
srvX$ sudo routinator-initwhich sets up the rpki cache directory and the TAL directory, by default under /var/lib/routinator/rpki-cache and /var/lib/routinator/tals. The TALs from the 5 Regional Internet Registries are provided as part of the distribution, but the ARIN TAL requires each user to agree to their Relying Party Agreement - the initialisation will display this:
Before we can install the ARIN TAL, you must have read
and agree to the ARIN Relying Party Agreement (RPA).
It is available at

https://www.arin.net/resources/manage/rpki/rpa.pdf

If you agree to the RPA, please run the command
again with the --accept-arin-rpa option.
Click on the link and read the ARIN RPA. Then we re-run the initialisation like this:
srvX$ sudo routinator-init --accept-arin-rpaand the output should display something like this:
Created local repository directory /var/lib/routinator/rpki-cache
Installed 5 TALs in /var/lib/routinator/tals
ARIN’s TAL1 should now be in place, and Routinator will run properly.
Note Well: Please do verify these instructions by following what the Routinator initialisation process recommends - don’t just copy the notes here!
We are now ready to run Routinator. To do that, we tell systemctl to activate it, and start it running straight away, like this:
srvX$ sudo systemctl enable --now routinatorWe can check that it is running using:
srvX$ sudo systemctl status routinatorand check the logs using:
srvX$ sudo journalctl --unit=routinatorYou should see output looking similar to this:
● routinator.service - Routinator 3000
   Loaded: loaded (/lib/systemd/system/routinator.service; enabled; vendor preset: dis
   Active: active (running) since Fri 2020-12-18 16:28:46 AEST; 53s ago
     Docs: man:routinator(1)
 Main PID: 2490 (routinator)
    Tasks: 18 (limit: 4915)
   CGroup: /system.slice/routinator.service
           ├─2490 /usr/bin/routinator --config=/etc/routinator/routinator.conf --
           ├─2513 rsync --contimeout=10 --timeout=300 -rltz --delete rsync://repo
           └─2535 rsync --contimeout=10 --timeout=300 -rltz --delete rsync://repo

Dec 18 16:28:46 srv1 systemd[1]: Started Routinator 3000.
(noting that the lines are truncated at the screen width).
The first time Routinator is run it will download all the VRPs from the various Certificate Authorities (CAs) - this will take a while (unless on NSRC’s co-located VTPs which all have high bandwidth Internet connectivity).
Note: Once you have started this command running, it might be a good idea to have a refreshment break. With 8 Groups building Routinator at the same time, it takes around 20 minutes to sync the VRPs (around 1.7Gbytes worth at time of writing) assuming a 100Mbps Internet connection. The VRPs are synced mostly using HTTP and RRDP, but there are still some CAs only supporting RSYNC, which seems to result in a much slower rate of copying them to your lab server.
Once the journalctl command (or the ps ax command) shows that the Routinator VRP download has completed, you are ready to move on to the next step.
We are now ready to run the Routinator server for our routers.
First, we should restore our connection to our Core router, as we will need this for the labs ongoing, so that the routers can talk to the validator. We simply run:
srvX$ sudo netplan applyThen check the routing table again:
srvX$ ip route
default via 100.68.1.29 dev ens3 proto static
100.64.0.0/22 dev ens4 proto kernel scope link src 100.64.0.10
100.68.1.28/30 dev ens3 proto kernel scope link src 100.68.1.30
Note that the default route now points to our Core router again.
Next, we need to modify the Routinator configuration file to suit our lab environment. The default file is called routinator.conf and is located in the /etc/routinator directory. Let’s edit the default configuration file:
srvX$ sudo editor /etc/routinator/routinator.confand make sure the following settings are in the file (remembering to replace X in the addresses with your group number):
# Routinator Configuration
#
# <lots of preamble explaining the configuration file>
#
repository-dir = "/var/lib/routinator/rpki-cache"
tal-dir = "/var/lib/routinator/tals"
rsync-args = ["-4"]
rtr-listen = ["127.0.0.1:3323", "[::1]:3323", "100.68.X.30:3323", "[2001:DB8:X:21::30]:3323"]
http-listen = ["127.0.0.1:8323"]
#
Some explanation of the options:
The repository-dir and tal-dir entries are the default values Routinator expects for where the VRPs and the TALs are kept. Routinator won’t run without these being set.
Restrict Routinator to using IPv4 for rsync from our lab network - most CAs now support HTTP or RRDP for synchronisation.
The rtr-listen entry has routinator listening to all connections made to it over IPv4 and IPv6 to its loopback address (to allow for testing) and its ethernet LAN address, sufficient for our needs in our lab.
Routinator by default has a web server listening on port 8323 to allow the operator to check the its status.
Save the modified configuration file.
Next, restart Routinator by running:
srvX$ sudo systemctl restart routinatorand verify that it is indeed running, as you did earlier
Finally, verify that Routinator is indeed listening by using telnet to connect to port 3323 on the SRV appliance. You should get a connection being offered. For example:
srvX$ telnet localhost 3323
Trying ::1...
Connected to localhost.
Escape character is '^]'.

telnet> q
Connection closed.
The Routinator is now ready to use in the upcoming labs.
You can check that it is listening for connections too:
srvX$ ss -an | grep 3323
tcp     LISTEN   0        128           100.68.X.30:3323            0.0.0.0:*
tcp     LISTEN   0        128             127.0.0.1:3323            0.0.0.0:*
tcp     LISTEN   0        128   [2001:db8:X:21::30]:3323               [::]:*
tcp     LISTEN   0        128                 [::1]:3323               [::]:*
(note that these notes have X inserted instead of the actual address)
We are now ready to move on. Please show the lab instructors your working Routinator configuration and the output of the diagnostic commands above.
If you ever need to download ARIN’s TAL, run curl https://www.arin.net/resources/manage/rpki/arin-rfc7730.tal > ~/.rpki-cache/tals/arin.tal↩