In this lab, you’re going to:
groupX-server instancegroupX-terraform
instanceUsing the AWS web interface, EC2 instances, find your groupX-server and use instance connect to get a shell on it. The prompt will look like this (but with a different IP address):
ubuntu@ip-10-30-0-74:~$ Refresh the list of packages:
sudo apt updateInstall ansible:
sudo apt install ansibleWhen prompted if you want to continue, answer “y”. (It will also install some other packages that ansible depends on).
Test that installation worked:
ansible --versionshould show you some information about the ansible version.
You can also test ansible by using the ping module to
talk to yourself: without any inventory, ansible knows about
localhost.
ansible -m ping localhostThe response should look like this:
[WARNING]: No inventory was parsed, only implicit localhost is available
localhost | SUCCESS => {
    "changed": false,
    "ping": "pong"
}
We could now write a playbook which makes changes to groupX-server itself, but that’s not as interesting as using ansible to manage another machine.
In the terraform access, you created an SSH private/public key pair,
and terraform installed the public key on your instance
groupX-terraform. You’re now going to test this.
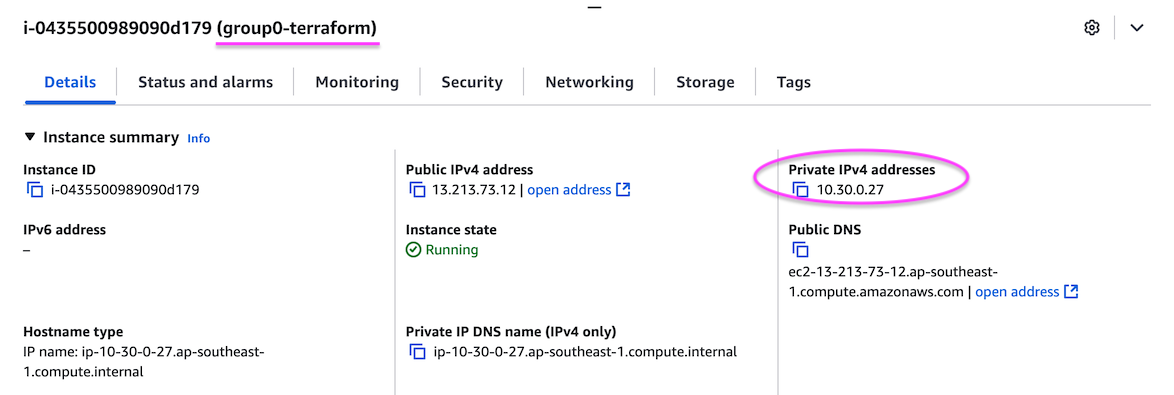
Find out the private IP address of your groupX-terraform
instance, and write it down somewhere. The easiest way to get this is
from the EC2 console; click on the instance in the list of instances,
and you’ll get detailed information in the panel below.
Let’s call it 10.30.0.ZZZ
Now, return to the shell of your groupX-server.
Check you still have the keys you created before:
ls -l ~/.sshThe repsonse should include “manager-key” and “manager-key.pub”, like this:
-rw------- 1 ubuntu ubuntu 487 Aug 13 03:45 authorized_keys
-rw------- 1 ubuntu ubuntu 411 Aug 12 15:15 manager-key        <<< NOTE
-rw-r--r-- 1 ubuntu ubuntu 102 Aug 12 15:15 manager-key.pub    <<< NOTE
If it doesn’t, ask for help!
Now, try to ssh from this machine to your
groupX-terraform instance. Replace the IP address below
with the correct IP address that you just wrote down.
ssh ubuntu@10.30.0.ZZZOn first attempt, you should get a response like this:
The authenticity of host '10.30.0.27 (10.30.0.27)' can't be established.
ED25519 key fingerprint is SHA256:1kaf/PO+UccAGwT39bqohVprSbBI57twCEvQhKHRyvI.
This key is not known by any other names.
Are you sure you want to continue connecting (yes/no/[fingerprint])?
Type “yes” in full.
But then the login will fail:
ubuntu@10.30.0.27: Permission denied (publickey).That’s because you’ve not selected the right private key to use. Repeat the command like this:
ssh -i ~/.ssh/manager-key ubuntu@10.30.0.ZZZYou should now be automatically logged into the other instance:
Welcome to Ubuntu 24.04.2 LTS (GNU/Linux 6.14.0-1010-aws x86_64)

 * Documentation:  https://help.ubuntu.com
 * Management:     https://landscape.canonical.com
 * Support:        https://ubuntu.com/pro

... more text ...

ubuntu@ip-10-30-0-ZZZ:~$
If this doesn’t work, ask for help!
Assuming it worked, you can logout again;
exitThe response will be:
logout
Connection to 10.30.0.ZZZ closed.
and you’ll be back at the groupX-server prompt.
Back at groupX-server, enter this command to make sure you’re back at your home directory (“cd” = “change directory”)
cdNow create a file called hosts using an editor of your
choice, e.g. nano:
nano hostsInside this file, just put one line (changing X to your group number as normal):
groupX-terraformThis is your inventory. Save the file (in nano, this is Ctrl-X, Y, Enter)
Now try communicating with this host:
ansible -i hosts -m ping groupX-terraformYou should get an error like this:
groupX-terraform | UNREACHABLE! => {
    "changed": false,
    "msg": "Failed to connect to the host via ssh: ssh: Could not resolve hostname groupX-terraform: Temporary failure in name resolution",
    "unreachable": true
}
The problem is that the host name does not exist in the DNS.
If instead you got this message:
[WARNING]: Could not match supplied host pattern, ignoring: groupX-terraform
[WARNING]: No hosts matched, nothing to do
it means the hostname you put on the command line doesn’t match the hostname in your inventory, or you didn’t select the inventory with
-i. Fix it.
Since we have no DNS for this hostname, we have to tell ansible what IP address to connect to.
Use your editor to open the hosts file again, and change
the line so it looks like this, replacing the IP address with the
correct one for your groupX-terraform instance:
groupX-terraform ansible_host=10.30.0.ZZZSave, and repeat the command:
ansible -i hosts -m ping groupX-terraformNow there should be a different error:
groupX-terraform | UNREACHABLE! => {
    "changed": false,
    "msg": "Failed to connect to the host via ssh: ubuntu@10.30.0.ZZZ: Permission denied (publickey).",
    "unreachable": true
}
Looks like we’re using the wrong credentials. The solution is to edit the hosts file again, so that it looks like this:
groupX-terraform ansible_host=10.30.0.ZZZ ansible_user=ubuntu ansible_private_key_file=/home/ubuntu/.ssh/manager-keyRepeat the command again:
ansible -i hosts -m ping groupX-terraformand hopefully it will now work:
groupX-terraform | SUCCESS => {
    "ansible_facts": {
        "discovered_interpreter_python": "/usr/bin/python3"
    },
    "changed": false,
    "ping": "pong"
}
You can also give a group name:
ansible -i hosts -m ping allThe group “all” is implicitly created, and contains all hosts in your inventory. (In this case, you only have one).
If it’s still not working, add -vvv to the command line
to get more information:
ansible -i hosts -m ping groupX-terraform -vvvand then ask your instructors to help.
The following command lists the contents of the inventory, after ansible has read it in, and is useful especially to check which variable values have been assigned.
ansible-inventory -i hosts --listThe top level keys are groups. The group “ungrouped” is for hosts not directly to assigned ot any group; “all” is all hosts; and “_meta” has the variables assigned to each host and group.
Now you’re going to make a playbook to install a package on the target server.
Use your editor to create a file called setup.yml
- hosts:
    - groupX-terraform
  tasks:
    - ansible.builtin.apt:
        package: traceroute
        cache_valid_time: 3600
Be very careful with the alignment! Copy-paste from the
above. Especially note that the parameters for the module
(package: and cache_valid_time:) must be
indented underneat the module name
(ansible.builtin.apt)
It is permitted to bring the list bullet points in, so this is also valid although not recommended:
- hosts:
  - groupX-terraform
  tasks:
  - ansible.builtin.apt:
      package: traceroute
      cache_valid_time: 3600
You may also use other YAML forms, for example:
- hosts:
    - groupX-terraform
  tasks:
    - ansible.builtin.apt: {package: traceroute, cache_valid_time: 3600}
Once this is saved, you can do a “trial run” using the
--check flag:
ansible-playbook -i hosts setup.yml --checkThe response should look like this:
PLAY [groupX-terraform] ***************************************************************************************************************************************

TASK [Gathering Facts] ****************************************************************************************************************************************
ok: [groupX-terraform]

TASK [ansible.builtin.apt] ************************************************************************************************************************************
changed: [groupX-terraform]

PLAY RECAP ****************************************************************************************************************************************************
groupX-terraform           : ok=2    changed=1    unreachable=0    failed=0    skipped=0    rescued=0    ignored=0
Now run it without --check to make it work for real:
ansible-playbook -i hosts setup.ymlThis time it should be slower, as it’s actually doing the package installation on the remote host. But after a delay, you’ll get an error:
TASK [ansible.builtin.apt] ************************************************************************************************************************************
fatal: [group0-terraform]: FAILED! => {"changed": false, "msg": "Failed to lock apt for exclusive operation: Failed to lock directory /var/lib/apt/lists/: E:Could not open lock file /var/lib/apt/lists/lock - open (13: Permission denied)"}
The “Permission denied” is telling you that you’re trying to do something which requires root access.
Edit your playbook (setup.yml) and add a new line
“become: true”, which lines up with the “hosts:” and “tasks:”:
- hosts:
    - group0-terraform
  become: true
  tasks:
    - ansible.builtin.apt:
        package: traceroute
        cache_valid_time: 3600
Try again:
ansible-playbook -i hosts setup.ymlHopefully, this time it should succeed:
PLAY [group0-terraform] ***************************************************************************************************************************************

TASK [Gathering Facts] ****************************************************************************************************************************************
ok: [group0-terraform]

TASK [ansible.builtin.apt] ************************************************************************************************************************************
changed: [group0-terraform]

PLAY RECAP ****************************************************************************************************************************************************
group0-terraform           : ok=2    changed=1    unreachable=0    failed=0    skipped=0    rescued=0    ignored=0
(if not, see if you can debug the problem, or ask for help).
Finally, run it another time:
ansible-playbook -i hosts setup.ymlThis time you should see “changed=0” because the package is already installed. This is an “idempotent” operation: running it multiple times is the same as running it once.
To save having to specify -i hosts all the time, you can
create a configuration file called ansible.cfg, as
follows:
[defaults]
inventory = hosts
Once you’ve done that, this simpler command should work:
ansible -m ping allIt applies to ansible-playbook too.
There is a lot more to learn about ansible which we cannot cover here!
If you have time though, here’s an example of how to create a “role” which is a chunk of configuration that you can re-use in a playbook. This role will install a new index.html in your webserver.
These have to follow a set directory structure, so start by making the directories:
mkdir -p ~/roles/webpage/tasks
mkdir -p ~/roles/webpage/templates
(When you prefix a filename with ~ this is a shortcut
which means “your home directory”, e.g. /home/ubuntu)
Use your editor to create ~/roles/webpage/tasks/main.yml
with this content:
- name: install index.html
  template:
    src: index.html.j2
    dest: /var/www/html/index.html
And create ~/roles/webpage/templates/index.html.j2 with
this content:
This server is running on {{ ansible_fqdn }}To use this role, you have to invoke it from a playbook. So finally,
create a new playbook called web.yml:
- hosts:
    - group0-terraform
  become: true
  roles:
    - webpage
and run it:
ansible-playbook web.yml The response should show that it has installed a new index.html.
This role also demonstrates two other features of ansible: * The
automatic collection of “facts” about the target system, in this case
ansible_fqdn has the fully-qualified domain name * jinja2
template expansion, where variables and facts can be inserted into the
content
You can check the content of your new index.html by using curl:
curl http://10.30.0.ZZZ/or by pointing a browser at groupX-terraform’s public IP address.
Ansible can fetch its inventory by querying the EC2 API. Our machine already has a role which permits this (to allow us to use the AWS CLI)
To configure the AWS EC2 inventory:
Create a file called hosts_aws_ec2.yml (the filename
must end with aws_ec2.yml or
aws_ec2.yaml or it won’t be matched by the plugin)
plugin: amazon.aws.aws_ec2
regions:
  - ap-southeast-1
hostnames: ["tag:Name", "private-dns-name"]
compose:
  ansible_host: private_ip_address
(this says to use the manually-assigned name if it has one, otherwise the private DNS name; and to use the private IP address for SSH connection)
Now view the contents:
ansible-inventory -i hosts_aws_ec2.yml --list | lessThis is likely to be a very large amount of information, as it includes a lot of metadata about each host - but press capital “G” to go to the end and there should be a list of hosts, e.g.
   "all": {
        "children": [
            "ungrouped",
            "aws_ec2"
        ]
    },
    "aws_ec2": {
        "hosts": [
            "ip-10-0-1-210.ap-southeast-1.compute.internal",
            "ip-10-0-2-137.ap-southeast-1.compute.internal",
            "ip-10-0-1-239.ap-southeast-1.compute.internal",
            "group0-terraform",
            "ip-10-0-1-253.ap-southeast-1.compute.internal",
            "ip-10-0-2-9.ap-southeast-1.compute.internal",
            "ip-10-0-2-240.ap-southeast-1.compute.internal",
            "ip-10-0-2-123.ap-southeast-1.compute.internal",
            "group0-server",
            "ip-10-0-2-118.ap-southeast-1.compute.internal",
            "ip-10-0-1-95.ap-southeast-1.compute.internal",
            "ip-10-0-1-157.ap-southeast-1.compute.internal",
        ]
    }
}
Check that your groupX-terraform host is there. Hit “q” to exit the pager.
Then in principle, you can communicate with it using e.g.
ansible -i hosts_aws_ec2.yml -m ping groupX-terraformbut this will fail because from that inventory, ansible doesn’t know which username to login as or which SSH private key to authenticate with.
To fix this, apply some settings to all these hosts. Create a directory called “group_vars”:
mkdir group_varsThen create a file group_vars/aws_ec2.yml with the
following contents:
ansible_username: ubuntu
ansible_private_key_file: /home/ubuntu/.ssh/manager-key
These settings are applied to all hosts in the group called “aws_ec2”. With luck, you can make it work:
ansible -i hosts_aws_ec2.yml -m ping groupX-terraformresponse:
groupX-terraform | SUCCESS => {
    "ansible_facts": {
        "discovered_interpreter_python": "/usr/bin/python3"
    },
    "changed": false,
    "ping": "pong"
}