Run a single-container standalone application under docker.
Connect to your groupX-server where you installed docker, and switch to the “root” user if not already there:
$ sudo -s
#Keycloak is a fairly complex application to build and install (it depends on Java). Here we’ll show how easy it is to get up and running in a docker container.
Because it’s a networked application, we’ll need to enabling forwarding of traffic on a TCP port to reach it.
Because it’s going to be accessible from the whole Internet, you’ll need to set a password so random users can’t access it. But we’ll minimise the risk by allowing access only from the classroom public IP address.
Run the following command, replacing XXXXXXXX with a password that you choose:
# docker run -p 8443:8443 -e KEYCLOAK_USER=admin -e KEYCLOAK_PASSWORD=XXXXXXXX --name keycloak quay.io/keycloak/keycloak:15.0.2After the image layers have been downloaded, you should find the application startup logs written to the console. While that happens, here’s an explanation of the flags:
-p 8443:8443: accept connections on port 8443 on the
host, and forward them to port 8443 on the container. How do we know the
container listens on port 8443? The container author has to document
this!-e VAR=VALUE: set environment variable VAR to VALUE.
This is used to pass settings to the container. Again, to know which
settings a given container understands, you need to look in its
documentation.--name keycloak: assign a name to the container, to
prevent docker choosing a random name like “eloquent_kapitsa”After a minute or so it will finish initializing, and no more logs are output:
...
19:12:32,983 INFO  [org.jboss.as] (Controller Boot Thread) WFLYSRV0025: Keycloak 15.0.2 (WildFly Core 15.0.1.Final) started in 12048ms - Started 692 of 977 services (686 services are lazy, passive or on-demand)
19:12:32,984 INFO  [org.jboss.as] (Controller Boot Thread) WFLYSRV0060: Http management interface listening on http://127.0.0.1:9990/management
19:12:32,984 INFO  [org.jboss.as] (Controller Boot Thread) WFLYSRV0051: Admin console listening on http://127.0.0.1:9990
That’s it - one command to run a complex application!
To access the web interface, you’ll need to open up port 8443 in a security group. You’ll also need to know your instance’s public IP address.
In the AWS web interface, navigate to EC2. There is a navigation panel to the left (if necessary, click on the hamburger to open it).
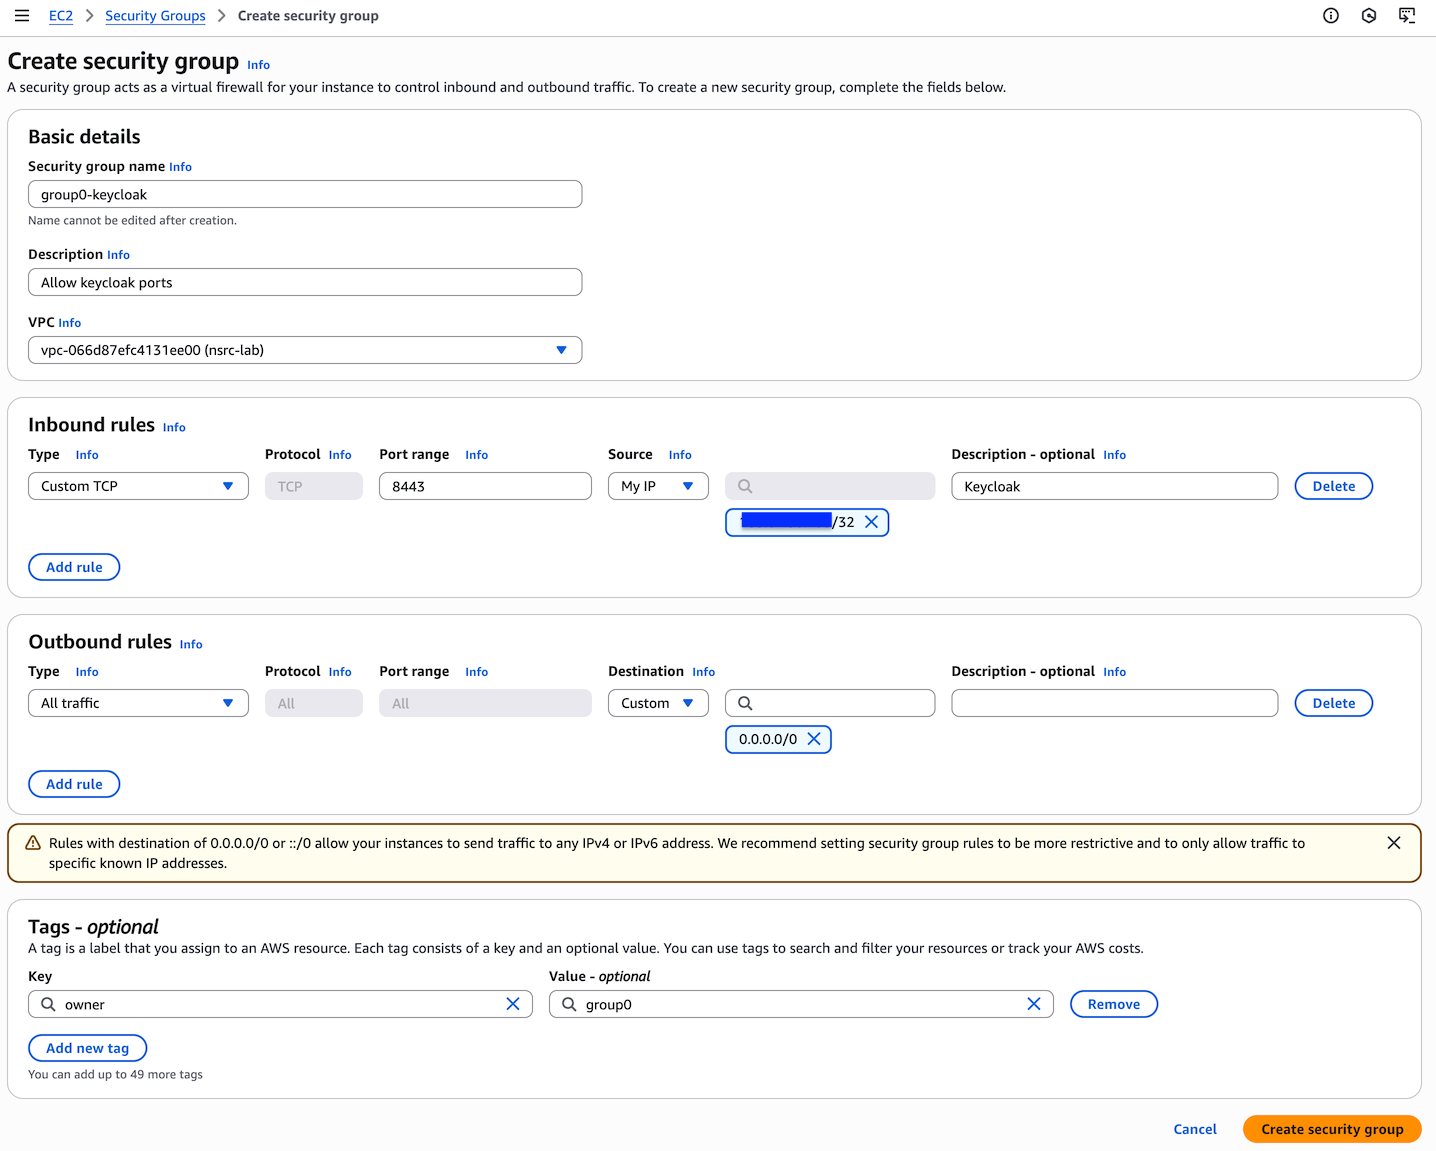
Click on “Security Groups” under “Network & Security”, then click “Create Security Group” at the top right.
Enter the following parameters
Then click “Create security group” at the bottom right.
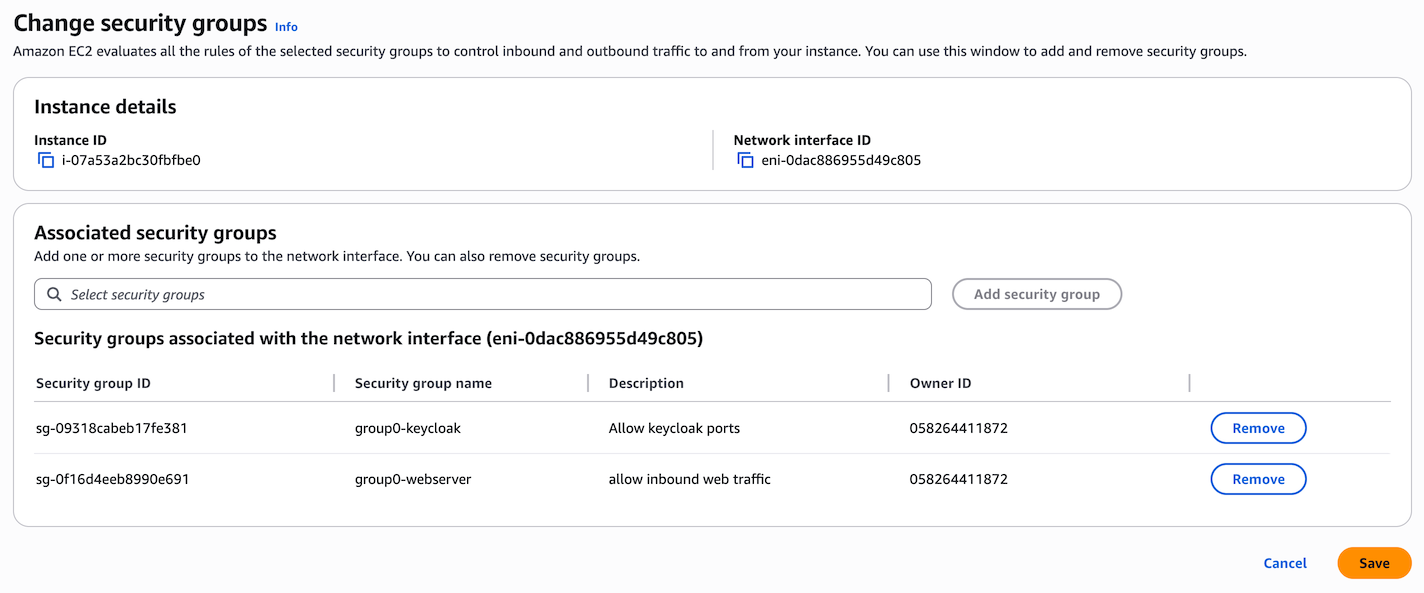
Now you need to apply this to your instance. Go to the list of instances, and click on your instance (groupX-server). Click on Actions > Security > Change security groups.
Select your newly-created security group from the drop-down, then click “Add Security Group” to the right, so that now your instance has two security groups. Finally click Save.
Finally, get your instance’s public IP address (or public DNS name); these are available from the list of instances.
Now point your web browser at port 8443 on your instance, with HTTPS:
Accept the self-signed certificate. You should get a web page saying “Welcome to Keycloak”.
Click on “Administration Console”. Login as “admin” and the password you chose when starting the container.
You have a running keycloak server!
Go back to where you see the console logs. Stop the container by hitting ctrl-C. This should return you back to the shell prompt.
...
19:27:33,880 INFO  [org.infinispan.CLUSTER] (ServerService Thread Pool -- 78) ISPN000080: Disconnecting JGroups channel ejb
19:27:33,891 INFO  [org.jboss.as] (MSC service thread 1-2) WFLYSRV0050: Keycloak 15.0.2 (WildFly Core 15.0.1.Final) stopped in 72ms
*** JBossAS process (201) received TERM signal ***
root@ip-10-30-0-74:/home/ubuntu#
Now try running the container again using the exact same command (you can use cursor up and cursor down to bring back commands you’ve already used). What happens this time?
# docker run -p 8443:8443 -e KEYCLOAK_USER=admin -e KEYCLOAK_PASSWORD=XXXXXXXX --name keycloak quay.io/keycloak/keycloak:15.0.2
docker: Error response from daemon: Conflict. The container name "/keycloak" is already in use by container "7cf852e94fc60fd480bdb474f17e4235c90517fa151a8ebf7f1828c9712179e0". You have to remove (or rename) that container to be able to reuse that name.

Run 'docker run --help' for more information
What you’re trying to do is to create a new container with name “keycloak”. But you already have a container called “keycloak” (even though it’s stopped). You can see it like this:
# docker ps -a
CONTAINER ID   IMAGE                              COMMAND                  CREATED         STATUS                     PORTS                                       NAMES
7cf852e94fc6   quay.io/keycloak/keycloak:15.0.2   "/opt/jboss/tools/do…"   8 minutes ago   Exited (0) 2 minutes ago                                               keycloak
So what can you do now? You can simply restart the existing container:
# docker start keycloak
keycloak
#
This time, keycloak has started in the background - it’s returned straight back to the shell, and you can’t see the console logs it generates.
Those logs are still visible using the “docker logs” command:
# docker logs keycloak
...
19:30:40,111 INFO  [org.jboss.as] (Controller Boot Thread) WFLYSRV0025: Keycloak 15.0.2 (WildFly Core 15.0.1.Final) started in 9812ms - Started 692 of 977 services (686 services are lazy, passive or on-demand)
19:30:40,112 INFO  [org.jboss.as] (Controller Boot Thread) WFLYSRV0060: Http management interface listening on http://127.0.0.1:9990/management
19:30:40,112 INFO  [org.jboss.as] (Controller Boot Thread) WFLYSRV0051: Admin console listening on http://127.0.0.1:9990
That’s all good.
(If you did really want to run two instances of keycloak at once, you’d have to give them different names, and accept incoming connections on a different port)
It’s often possible to get a shell inside a running container, and this can be useful for debugging. Try the following:
# docker exec -it keycloak bash
bash-4.4$ hostname
44c432836df5
bash-4.4$ ps auxwww
bash: ps: command not found
The good news: there is a bash shell available in the container, and we can run it. Note that the container has its own “hostname” (which is the container ID), separate from the system hostname.
The bad news: many containers have a very cut-down environment with few utilities. In this case, even the most basic “ps” utility is missing.
We can have a look at what is in the /bin directory:
bash-4.4$ ls /bin
'['           cp               domainname           .... etc
To look at process information, we may need to get creative. The
kernel exposes its list of processes under a directory called
/proc, which we can list:
bash-4.4$ ls /proc
1     asound     consoles   dma          fs          kallsyms   kpagecgroup  mdstat   mtrr          sched_debug  softirqs       sysvipc      version
201   buddyinfo  cpuinfo    driver       interrupts  kcore      kpagecount   meminfo  net           schedstat    stat           thread-self  version_signature
456   bus        crypto     execdomains  iomem       keys       kpageflags   misc     pagetypeinfo  scsi         swaps          timer_list   vmallocinfo
471   cgroups    devices    fb           ioports     key-users  loadavg      modules  partitions    self         sys            tty          vmstat
acpi  cmdline    diskstats  filesystems  irq         kmsg       locks        mounts   pressure      slabinfo     sysrq-trigger  uptime       zoneinfo
You won’t see exactly the same as this. But notice the numeric entries:
These are processes, each with its own PID. We can only see the processes inside this container.
PID 1 is the process which was started when the container started, so is normally the application process. We can check this:
bash-4.4$ cat /proc/1/cmdline
/bin/sh/opt/jboss/keycloak/bin/standalone.sh-Djboss.bind.address=172.17.0.3-Djboss.bind.address.private=172.17.0.3-c=standalone-ha.xml-b0.0.0.0
Yes, you can see that this is some script for running keycloak,
together with some flags like
-D jboss.bind.address172.17.0.3 (in this view, all the
arguments are squashed together without spaces)
Now exit the shell inside the container, by typing:
exitand you should be back at the outer VM:
root@ip-10-30-0-74:/home/ubuntu# Now, suppose a new version of keycloak comes out in future, say 15.0.3. How would you upgrade it?
The answer may be very surprising. You simply destroy the old container, and start a new container from the new image. You never login to a container and perform upgrades inside the container!
However, this presents a problem. What happens to all the data which was written by the application inside the container? That will be lost.
There are two solutions here.
The first is to make the application “stateless” - so it doesn’t keep any important local data at all. It could, for example, connect to a database over the network, and store all its state in the database. (This is the recommended way to run keycloak in production).
The other option is to mount a “docker volume” inside the container. The docker volume is a subdirectory which persists even when the container is destroyed, and can be mounted in a new container.
To do this, you need to know which subdirectory within the container needs to be preserved. Again, you need to look at the container documentation.
Keycloak makes this hard
to find (because they prefer that you use an external database), but
the directory is /opt/jboss/keycloak/standalone/data
So let’s start again. First, stop and destroy the existing container.
# docker stop keycloak
keycloak
# docker rm keycloak
keycloak
#
Now we’ll create a docker volume called
keycloak-data
# docker volume create keycloak-data
keycloak-data
Now start keycloak again, in the background (-d), and this time with the volume attached. Remember to change XXXXXXXX to your secret password again.
# docker run -d -p 8443:8443 -v keycloak-data:/opt/jboss/keycloak/standalone/data -e KEYCLOAK_USER=admin -e KEYCLOAK_PASSWORD=XXXXXXXX --name keycloak quay.io/keycloak/keycloak:15.0.2The output of this command will just be the container ID. It’s running in the background, as you can see with:
# docker ps
e99474897aba   quay.io/keycloak/keycloak:15.0.2   "/opt/jboss/tools/do…"   17 seconds ago   Up 16 seconds   8080/tcp, 0.0.0.0:8443->8443/tcp, [::]:8443->8443/tcp   keycloak
Now we are safe. Whenever the application in the container writes
files underneath /opt/jboss/keycloak/standalone/data then
those files will go in the docker volume. To upgrade the application,
you can delete the container and recreate with the same volume
attached.
Do you want to test that the docker volume really does persist state?
We now have created some state.
Stop and destroy the container:
# docker stop keycloak
# docker rm keycloak
Recreate it, attached to the same docker volume as before (again, provide a password as XXXXXXXX):
# docker run -d -p 8443:8443 -v keycloak-data:/opt/jboss/keycloak/standalone/data -e KEYCLOAK_USER=admin -e KEYCLOAK_PASSWORD=XXXXXXXX --name keycloak quay.io/keycloak/keycloak:15.0.2Go back into the web interface, and look at the realms dropdown. Does it still have both “Master” and “Workshop”? It should!
You can keep track of your docker volumes using
docker volume list:
# docker volume list
DRIVER    VOLUME NAME
local keycloak-dataWhen you’ve finished, stop your container:
# docker stop keycloak
keycloak
# docker ps
CONTAINER ID   IMAGE        COMMAND                  CREATED       STATUS       PORTS                                       NAMES
# docker ps -a
CONTAINER ID   IMAGE                              COMMAND                  CREATED          STATUS                      PORTS                                       NAMES
7cf852e94fc6   quay.io/keycloak/keycloak:15.0.2   "/opt/jboss/tools/do…"   27 minutes ago   Exited (0) 12 seconds ago                                               keycloak
#