In this lab, you’re going to manage disks using LVM command-line tools.
You will work together in your existing groups, on the node previously assigned to your group:
| group | cluster/node | group | cluster/node | group | cluster/node | ||
|---|---|---|---|---|---|---|---|
| group 1 | cluster1-node2 | group 7 | cluster2-node2 | group 13 | cluster3-node2 | ||
| group 2 | cluster1-node3 | group 8 | cluster2-node3 | group 14 | cluster3-node3 | ||
| group 3 | cluster1-node4 | group 9 | cluster2-node4 | group 15 | cluster3-node4 | ||
| group 4 | cluster1-node5 | group 10 | cluster2-node5 | group 16 | cluster3-node5 | ||
| group 5 | cluster1-node6 | group 11 | cluster2-node6 | group 17 | cluster3-node6 | ||
| group 6 | cluster1-node7 | group 12 | cluster2-node7 | group 18 | cluster3-node7 |
(node1 is not being used for any part of this exercise)
All these exercises will use the Linux shell. Get a shell on your
node by logging into the Proxmox GUI, select your group’s node using
Datacenter > clusterX-nodeY in the left column, then select
Shell >_ in the second column.
Either person in the group can type commands, while the other can help follow the instructions and check the results.
To find out what block devices are available on your node, type the
command lsblk.
From this point onwards, we’ll show commands you need to run prefixed
by # as the root prompt, and then the output next to it.
Copy the command after the # and type or paste it into the
shell. In this case:
# lsblk
NAME   MAJ:MIN RM  SIZE RO TYPE MOUNTPOINTS
sda      8:0    0   20G  0 disk
├─sda1   8:1    0  100M  0 part /boot/efi
└─sda2   8:2    0 19.9G  0 part /
sdb      8:16   0   12G  0 disk
sdc      8:32   0   12G  0 disk
sdd      8:48   0    8G  0 disk
sde      8:64   0    8G  0 disk
(If you see an error instead of expected output, check your command and then ask the instructors for help).
The disk devices are all files under the /dev
directory.
sda is the system disk; you can see it has two
partitions, mounted at /boot/efi and /.
There are then four other disks. We will use sdb and
sdc for this exercise; please leave sdd and
sde unused for a future lab.
Another useful command is blockdev. Try this command to
find the exact size (in bytes) of a given block device:
# blockdev --getsize64 /dev/sdb
12884901888
This value equals 12 x 1024 x 1024 x 1024, which is 12 gibibytes (12 GiB)
LVM uses a small amount of space for storing “metadata”, that is, information about how the data on disk is organized.
You use an entire disk as an LVM physical volume, or you can use a single partition. In this case, we’ll use the whole disk.
Mark device sdb as a physical volume for LVM (this
writes the metadata):
# pvcreate /dev/sdb
  Physical volume "/dev/sdb" successfully created.
Now create a volume group called “ssd” containing this disk:
# vgcreate ssd /dev/sdb
  Volume group "ssd" successfully created
That’s it!
Now we can list our physical volumes and our volume group:
# pvs
  PV         VG  Fmt  Attr PSize   PFree
  /dev/sdb   ssd lvm2 a--  <12.00g <12.00g
# vgs
  VG  #PV #LV #SN Attr   VSize   VFree
  ssd   1   0   0 wz--n- <12.00g <12.00g
The value <12.00g means “slightly less than 12GiB”,
because a small amount of space has been taken for metadata. To get the
exact size:
# vgs --units b
  VG  #PV #LV #SN Attr   VSize        VFree
  ssd   1   0   0 wz--n- 12880707584B 12880707584B
You should be able to see that the value 12880707584 (followed by B for bytes) is slightly smaller than the size of the disk, 12884901888 bytes.
In order to store some data in LVM, you need to create a logical volume: specify the size, the name, and the volume group to create it in.
# lvcreate --size 1g --name testvol ssd
  Logical volume "testvol" created.
It doesn’t matter if you use “1g” or “1G” - LVM always uses power-of-two units, so this is 1 gibibyte (1024 x 1024 x 1024 bytes).
It’s also possible to give the size in extents, e.g.
--extents 256means 256 x 4MiB = 1024MiB = 1GiB
List your logical volumes:
# lvs
  LV      VG  Attr       LSize Pool Origin Data%  Meta%  Move Log Cpy%Sync Convert
  testvol ssd -wi-a----- 1.00g
This logical volume now appears on your system as a new block device.
You can see it with lsblk:
# lsblk
NAME          MAJ:MIN RM  SIZE RO TYPE MOUNTPOINTS
sda             8:0    0   20G  0 disk
├─sda1          8:1    0  100M  0 part /boot/efi
└─sda2          8:2    0 19.9G  0 part /
sdb             8:16   0   12G  0 disk
└─ssd-testvol 252:0    0    1G  0 lvme     <<< NOTE!
sdc             8:32   0   12G  0 disk
sdd             8:48   0    8G  0 disk
sde             8:64   0    8G  0 disk
It’s available under several different names, which all link to a
name which is dynamically allocated by the “device mapper” (dm), for
example /dev/dm-0; you can’t control this name. But there
are alternative names which are stable and make it easier to find: these
include /dev/ssd/testvol,
/dev/mapper/ssd-testvol and
/dev/disk/by-id/dm-name-ssd-testvol. Examine one of these,
and you’ll find it’s a symbolic link to the underling dm device name:
e.g.
# ls -l /dev/mapper/ssd-testvol
lrwxrwxrwx 1 root root 7 Jul 24 13:39 /dev/mapper/ssd-testvol -> ../dm-0
We’ll use this style of name when accessing data in the logical volume.
Let’s create a filesystem inside our new logical volume, so we can store files in it.
# mke2fs /dev/mapper/ssd-testvol
mke2fs 1.47.0 (5-Feb-2023)
Discarding device blocks: done
Creating filesystem with 262144 4k blocks and 65536 inodes
Filesystem UUID: 7905f7ae-0bd9-48df-84e6-a22f301371f0
Superblock backups stored on blocks:
    32768, 98304, 163840, 229376

Allocating group tables: done
Writing inode tables: done
Writing superblocks and filesystem accounting information: done
Now we can mount it:
# mount /dev/mapper/ssd-testvol /mnt
# df -k /mnt
Filesystem              1K-blocks  Used Available Use% Mounted on
/dev/mapper/ssd-testvol 1030828 24 978376 1% /mnt(-k means give sizes in KiB). Then create a file in
it:
# echo "hello world" >/mnt/testfile
# cat /mnt/testfile
hello world
# df -k /mnt
Filesystem              1K-blocks  Used Available Use% Mounted on
/dev/mapper/ssd-testvol   1030828    52    978348   1% /mnt
Note that “Used” has gone up slightly.
What happens when our filesystem is nearly full? We can add some more space to the logical volume from the volume group. Remember we still have nearly 11GiB free:
# vgs
  VG  #PV #LV #SN Attr   VSize   VFree
  ssd   1   1   0 wz--n- <12.00g <11.00g
Let’s increase the size of our volume from 1GiB to 2GiB:
# lvextend --size 2g ssd/testvol
  Size of logical volume ssd/testvol changed from 1.00 GiB (256 extents) to 2.00 GiB (512 extents).
  Logical volume ssd/testvol successfully resized.
# lvs
  LV      VG  Attr       LSize Pool Origin Data%  Meta%  Move Log Cpy%Sync Convert
  testvol ssd -wi-ao---- 2.00g
In this command you could also use the device name e.g.
/dev/mapper/ssd-testvolif you prefer
That was easy. We can also check that the block device for this logical volume is 2GiB:
# blockdev --getsize64 /dev/mapper/ssd-testvol
2147483648
But, what about the filesystem?
# df -k /mnt
Filesystem              1K-blocks  Used Available Use% Mounted on
/dev/mapper/ssd-testvol   1030828    52    978348   1% /mnt
                          ^^^^^^^ NOTE
We can’t use the extra space yet. That’s because the filesystem is still structured to fit inside a 1GiB device; it doesn’t know that there’s more space available to use.
To fix this, we can grow the filesystem to fill all the available space. This can be done even while the filesystem is mounted.
# resize2fs /dev/mapper/ssd-testvol
resize2fs 1.47.0 (5-Feb-2023)
Filesystem at /dev/mapper/ssd-testvol is mounted on /mnt; on-line resizing required
old_desc_blocks = 1, new_desc_blocks = 1
The filesystem on /dev/mapper/ssd-testvol is now 524288 (4k) blocks long.
And now our filesystem is 2GiB:
# df -k /mnt
Filesystem              1K-blocks  Used Available Use% Mounted on
/dev/mapper/ssd-testvol   2062696    52   1968296   1% /mnt
^^^^^^^That’s fine, but what happens when we run out of space in the volume group and we can’t create or grow any more logical volumes?
We can simply add another physical disk. In this case, we’re going to add sdc to our “ssd” volume group.
# pvcreate /dev/sdc
  Physical volume "/dev/sdc" successfully created.
# vgextend ssd /dev/sdc
  Volume group "ssd" successfully extended
Now check the status:
# pvs
  PV         VG  Fmt  Attr PSize   PFree
  /dev/sdb   ssd lvm2 a--  <12.00g <10.00g
  /dev/sdc   ssd lvm2 a--  <12.00g <12.00g
# vgs
  VG  #PV #LV #SN Attr   VSize  VFree
  ssd   2   1   0 wz--n- 23.99g 21.99g
You can see that of the two disks, we have approx 10GiB free on the first and approx 12GiB free on the second. Our logical volume is still using only extents from the first disk.
But now, we can grow our logical volume bigger than a single disk. Let’s grow it to 16GiB:
# lvextend --size 16g ssd/testvol
  Size of logical volume ssd/testvol changed from 2.00 GiB (512 extents) to 16.00 GiB (4096 extents).
  Logical volume ssd/testvol successfully resized.
And grow the filesystem:
# resize2fs /dev/mapper/ssd-testvol
resize2fs 1.47.0 (5-Feb-2023)
Filesystem at /dev/mapper/ssd-testvol is mounted on /mnt; on-line resizing required
old_desc_blocks = 1, new_desc_blocks = 1
The filesystem on /dev/mapper/ssd-testvol is now 4194304 (4k) blocks long.
Let’s look at the physical volumes:
# pvs
  PV         VG  Fmt  Attr PSize   PFree
  /dev/sdb   ssd lvm2 a--  <12.00g    0
  /dev/sdc   ssd lvm2 a--  <12.00g 7.99g
Now we are using space on both sdb and sdc (in fact, sdb is now fully allocated, zero free). Let’s look at the logical volume:
# lvs
  LV      VG  Attr       LSize  Pool Origin Data%  Meta%  Move Log Cpy%Sync Convert
  testvol ssd -wi-ao---- 16.00g
But it’s not obvious that this volume spans two disks. A longer command will tell us more clearly:
# lvs --segments -o +devices
  LV      VG  Attr       #Str Type   SSize   Devices
  testvol ssd -wi-ao----    1 linear <12.00g /dev/sdb(0)
  testvol ssd -wi-ao----    1 linear   4.00g /dev/sdc(0)
The value ‘(0)’ is the number of the first extent on each disk which is used by this volume group. To get the exact ranges of extents used:
# lvs -a --segments -o +seg_pe_ranges
  LV      VG  Attr       #Str Type   SSize   PE Ranges
  testvol ssd -wi-ao----    1 linear <12.00g /dev/sdb:0-3070
  testvol ssd -wi-ao----    1 linear   4.00g /dev/sdc:0-1024
We’re done with this logical volume now, so unmount it and delete it:
# umount /mnt
# lvremove ssd/testvol
Do you really want to remove active logical volume ssd/testvol? [y/n]: y
  Logical volume "testvol" successfully removed.
Thin pools allow LVM to allocate space “lazily” - only when blocks are written to - instead of up front. All unwritten blocks are assumed to be zero.
Thin pools are important because both Proxmox and Linstor only permit snapshots on volumes in thin pools. (You can use regular logical volumes in both Proxmox and Linstor, but you won’t be able to snapshot them)
A thin pool is just a logical volume, inside which other logical volumes can be created lazily.
Let’s create a thin pool of size 4GiB. We’ll also specify that it should be allocated only on sdb (this is optional, but shows how you can control where logical volumes are placed).
# lvcreate --name thin0 --type thin-pool --size 4g ssd /dev/sdb
  Thin pool volume with chunk size 64.00 KiB can address at most <15.88 TiB of data.
  Logical volume "thin0" created.
Thin pools write smaller “chunks” (64KiB) than LVM “extents” (4MiB). This is the main reason why their snapshots are more efficient - less data needs to be copied when writing to a block that belongs to a snapshot.
Have a look at the thin pool:
# lvs
  LV    VG  Attr       LSize Pool Origin Data%  Meta%  Move Log Cpy%Sync Convert
  thin0 ssd twi-a-tz-- 4.00g             0.00   11.23
It’s empty (Data 0%), although some metadata is in use. (Metadata keeps tracks of which chunks are stored where, including in snapshots).
So how do we create a logical volume inside the thin pool?
# lvcreate --name testvol2 --virtualsize 1g --thinpool thin0 ssd
  Logical volume "testvol2" created.
Instead of --size we gave --virtualsize,
and we specified which thin pool to use.
# lvs
  LV       VG  Attr       LSize Pool  Origin Data%  Meta%  Move Log Cpy%Sync Convert
  testvol2 ssd Vwi-a-tz-- 1.00g thin0        0.00
  thin0    ssd twi-aotz-- 4.00g              0.00   11.33
Because we haven’t written anything to testvol2, it has not consumed any data space. Metadata usage has gone up slightly.
Now let’s create and mount a filesystem:
# mke2fs /dev/mapper/ssd-testvol2
...

# mount /dev/mapper/ssd-testvol2 /mnt
# lvs
  LV       VG  Attr       LSize Pool  Origin Data%  Meta%  Move Log Cpy%Sync Convert
  testvol2 ssd Vwi-aotz-- 1.00g thin0        1.69
  thin0    ssd twi-aotz-- 4.00g              0.42   11.52
Creating a filesystem writes a small amount of data (superblocks, root directory, inodes) so some space has been consumed from the thin pool. But it’s only consumed as blocks are written for the first time.
It’s even possible to create a logical volume which is larger than the underlying disk, although you’ll get some big warnings:
# lvcreate --name testbig --virtualsize 8g --thinpool thin0 ssd
  WARNING: Sum of all thin volume sizes (9.00 GiB) exceeds the size of thin pool ssd/thin0 (4.00 GiB).
  WARNING: You have not turned on protection against thin pools running out of space.
  WARNING: Set activation/thin_pool_autoextend_threshold below 100 to trigger automatic extension of thin pools before they get full.
  Logical volume "testbig" created.

# lsblk
NAME                MAJ:MIN RM  SIZE RO TYPE MOUNTPOINTS
sda                   8:0    0   20G  0 disk
├─sda1                8:1    0  100M  0 part /boot/efi
└─sda2                8:2    0 19.9G  0 part /
sdb                   8:16   0   12G  0 disk
├─ssd-thin0_tmeta   252:0    0    4M  0 lvm
│ └─ssd-thin0-tpool 252:2    0    4G  0 lvm
│   ├─ssd-thin0     252:3    0    4G  1 lvm
│   ├─ssd-testvol2  252:4    0    1G  0 lvm  /mnt
│   └─ssd-testbig   252:5    0    8G  0 lvm
└─ssd-thin0_tdata   252:1    0    4G  0 lvm
  └─ssd-thin0-tpool 252:2    0    4G  0 lvm
    ├─ssd-thin0     252:3    0    4G  1 lvm
    ├─ssd-testvol2  252:4    0    1G  0 lvm  /mnt
    └─ssd-testbig   252:5    0    8G  0 lvm
sdc                   8:32   0   12G  0 disk
sdd                   8:48   0    8G  0 disk
sde                   8:64   0    8G  0 disk
We have created a 8GiB logical volume, even though only 4GiB is available. Bad things would happen if we tried to write more than 4GiB of data to this volume - basically, writes would stall until you allocate more space to the thin pool. That means if you have overcommitted your thin pool, you need to monitor it very carefully.
It is straightforward to grow the thin pool, as long as you have spare extents in your volume group:
# lvextend --size 6g ssd/thin0
  Rounding size to boundary between physical extents: 8.00 MiB.
  Size of logical volume ssd/thin0_tmeta changed from 4.00 MiB (1 extents) to 8.00 MiB (2 extents).
  Size of logical volume ssd/thin0_tdata changed from 4.00 GiB (1024 extents) to 6.00 GiB (1536 extents).
  WARNING: Sum of all thin volume sizes (9.00 GiB) exceeds the size of thin pool ssd/thin0 (6.00 GiB).
  WARNING: You have not turned on protection against thin pools running out of space.
  WARNING: Set activation/thin_pool_autoextend_threshold below 100 to trigger automatic extension of thin pools before they get full.
  Logical volume ssd/thin0 successfully resized.
# lvs
  LV       VG  Attr       LSize Pool  Origin Data%  Meta%  Move Log Cpy%Sync Convert
  testbig  ssd Vwi-a-tz-- 8.00g thin0        0.00
  testvol2 ssd Vwi-aotz-- 1.00g thin0        1.69
  thin0    ssd twi-aotz-- 6.00g              0.28   10.89
Growing can also be automated, as the warning message said. However it is very difficult and risky to shrink a thin pool, ao automatic thin pool growth carries a risk because it could make irreversible changes without your approval.
Note: the thin pool actually consists of some hidden volumes which
LVM manages for you. You don’t need to worry about these, but you can
see them with the -a flag: you can see the data (tdata) and
metadata (tmeta) in separate volumes.
# lvs -a
  LV              VG  Attr       LSize Pool  Origin Data%  Meta%  Move Log Cpy%Sync Convert
  [lvol0_pmspare] ssd ewi------- 8.00m
  testbig         ssd Vwi-a-tz-- 8.00g thin0        0.00
  testvol2        ssd Vwi-aotz-- 1.00g thin0        1.69
  thin0           ssd twi-aotz-- 6.00g              0.28   10.89
  [thin0_tdata]   ssd Twi-ao---- 6.00g
  [thin0_tmeta]   ssd ewi-ao---- 8.00m
OK, let’s tidy up by removing our experimental logical volumes and the thin pool.
# umount /mnt
# lvremove ssd/testvol2
Do you really want to remove active logical volume ssd/testvol2? [y/n]: y
  Logical volume "testvol2" successfully removed.
# lvremove ssd/testbig
Do you really want to remove active logical volume ssd/testbig? [y/n]: y
  Logical volume "testbig" successfully removed.
# lvremove ssd/thin0
Do you really want to remove active logical volume ssd/thin0? [y/n]: y
Logical volume "thin0" successfully removed.You can use LVM for local disk storage in Proxmox.
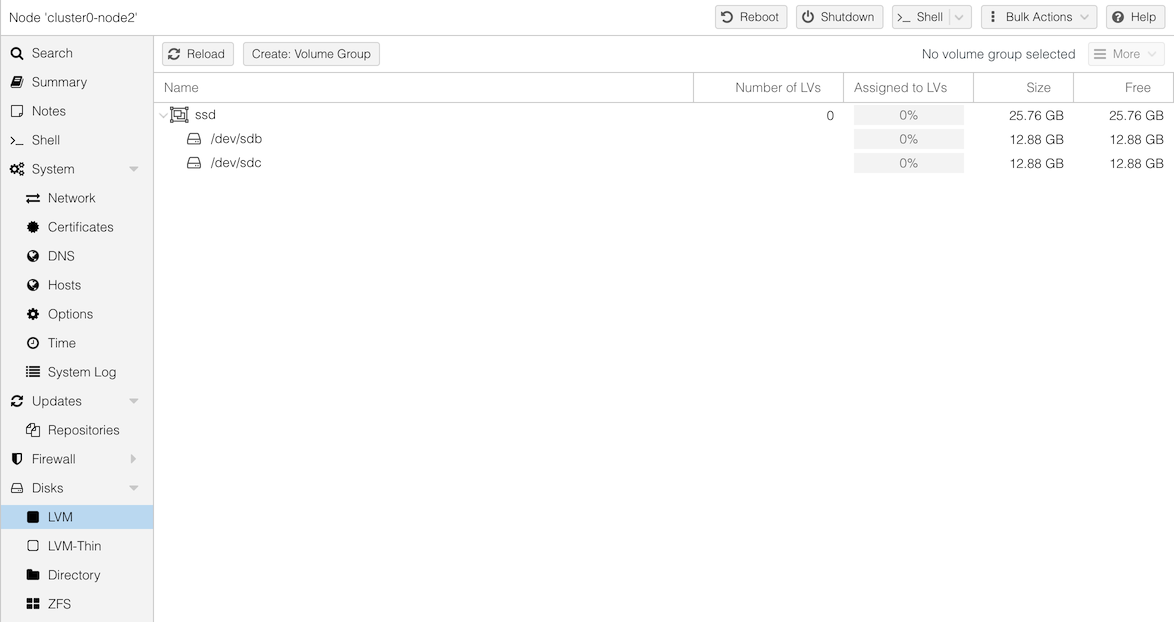
Go back into the GUI and click on your group’s node (clusterX-nodeY) in the first column. In the second column open “Disks” and look at “LVM” - you should see your LVM volume group “ssd” has been auto-detected. If you had any thin pools they would be visible under “LVM-Thin”.
Notice that Proxmox is showing sizes in Gigabytes, 1000x1000x1000 bytes
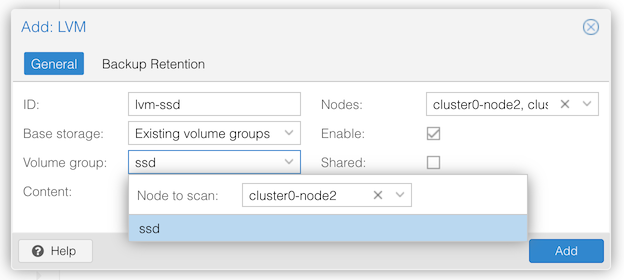
To make this LVM space available to Proxmox to use, you need to create a “Storage” entry.
Only one person in your entire cluster should do this
Click on “Datacenter” in the first column, “Storage” in the second.
Select “Add > LVM”.
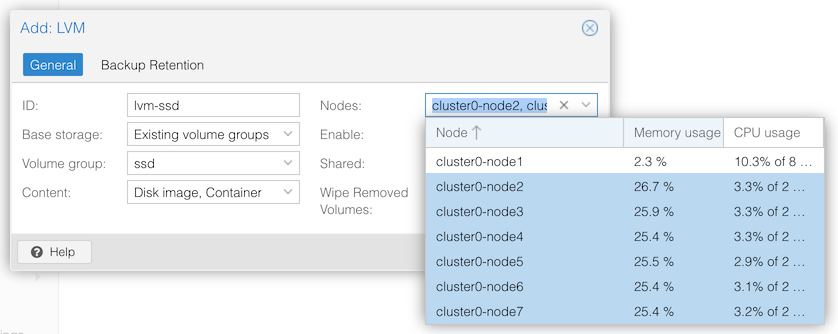
These “storage” definitions are cluster-wide: one definition covers all the nodes where this LVM volume group can be used.
The storage can be selected under the “disks” page when creating a new VM on a node, but we’re not going to use it now.
On your node, please make sure you’ve deleted any logical volumes you’ve created, so that your volume group is empty ready for the next lab.
# lvs
# vgs
  VG  #PV #LV #SN Attr   VSize  VFree
ssd 2 0 0 wz--n- 23.99g 23.99gIf you have time available, here are some extra things you can try.
When you create a logical volume, you can specify which physical volume(s) to allocate from:
# lvcreate --size 1g --name testvol ssd /dev/sdc
  Logical volume "testvol" created.
# pvs
  PV         VG  Fmt  Attr PSize   PFree
  /dev/sdb   ssd lvm2 a--  <12.00g <12.00g
  /dev/sdc   ssd lvm2 a--  <12.00g <11.00g
# lvs -a --segments -o +seg_pe_ranges
  LV      VG  Attr       #Str Type   SSize PE Ranges
  testvol ssd -wi-a-----    1 linear 1.00g /dev/sdc:0-255
If you don’t, you get the default strategy, which is described under “ALLOCATION” in the lvm(8) man page.
But you can also move extents if necessary. Suppose you decided you need to replace drive sdc; here is how you tell LVM to move all extents off drive sdc (you can also limit it to moving specific logical volumes)
# pvmove /dev/sdc
  /dev/sdc: Moved: 13.67%
  /dev/sdc: Moved: 100.00%
# lvs -a --segments -o +seg_pe_ranges
  LV      VG  Attr       #Str Type   SSize PE Ranges
  testvol ssd -wi-a-----    1 linear 1.00g /dev/sdb:0-255
You can see all the extents are now on sdb.
Remove the volume to clean up:
# lvremove ssd/testvol
Do you really want to remove active logical volume ssd/testvol? [y/n]: y
Logical volume "testvol" successfully removed.One thing you should realise from above is that using two or more
disks in a volume group does not give you any protection from disk
failure. In fact, it’s worse: if either sdb
or sdc failed, then any logical volume or
filesystem whose extents span both disks will be destroyed.
There are various ways to address this. One way is to use protection underneath LVM (e.g. hardware RAID systems or software mdraid), or you can replicate data across multiple servers (e.g. drbd/linstor, ceph).
But here, we’re going to show how LVM itself can do RAID1 mirroring. This is especially useful on standalone systems.
Check that our physical volume contains two disks, and there’s free space on both of them:
# pvs
  PV         VG  Fmt  Attr PSize   PFree
  /dev/sdb   ssd lvm2 a--  <12.00g <12.00g
  /dev/sdc   ssd lvm2 a--  <12.00g <12.00g
Now create a mirrored volume:
# lvcreate -m 1 --name mirrorvol --size 1g ssd
  Logical volume "mirrorvol" created.
# lvs
  LV        VG  Attr       LSize Pool Origin Data%  Meta%  Move Log Cpy%Sync Convert
  mirrorvol ssd rwi-a-r--- 1.00g                                    100.00
You may see a “Cpy%” less than 100 if you are quick. This is because LVM is in the process of copying the data from one side of the mirror to the other.
Check how our disk space is used:
# pvs
  PV         VG  Fmt  Attr PSize   PFree
  /dev/sdb   ssd lvm2 a--  <12.00g 10.99g
  /dev/sdc   ssd lvm2 a--  <12.00g 10.99g
Space has been consumed from both physical volumes. For full details:
# lvs -a -o name,copy_percent,health_status,segtype,seg_pe_ranges ssd
  LV                   Cpy%Sync Health          Type   PE Ranges
  mirrorvol            100.00                   raid1  mirrorvol_rimage_0:0-255 mirrorvol_rimage_1:0-255
  [mirrorvol_rimage_0]                          linear /dev/sdb:1-256
  [mirrorvol_rimage_1]                          linear /dev/sdc:1-256
  [mirrorvol_rmeta_0]                           linear /dev/sdb:0-0
  [mirrorvol_rmeta_1]                           linear /dev/sdc:0-0
LVM mirroring creates hidden metadata volumes, which keep track of
which extents are “dirty” i.e. need copying to the other disk, and data
(image) volumes on each disk. The -a flag makes these
visible.
We don’t need this any more, so delete it.
# lvremove ssd/mirrorvol
Do you really want to remove active logical volume ssd/mirrorvol? [y/n]: y
  Logical volume "mirrorvol" successfully removed.
Note: it’s straightforward to convert a regular LVM volume to
mirrored, using lvconvert, as long as there is enough free
space on another disk to set up the mirroring.
However, Proxmox doesn’t know about LVM mirroring, so any LVM volumes it creates will be unmirrored. You would have to manually convert them to mirrored if you want this protection.
Thin pools are useful, but are especially risky if spread across multiple disks. Lazy writes could end up written on any disk, and a loss of a single disk could destroy all the volumes in the thin pool.
Again, this might not be a problem if you have another level of redundancy. But another option is to make a mirrored thin pool.
Doing this takes only a little more work than a normal thin pool: you have to create a mirrored metadata volume and a mirrored data volume, and then combine them into a thin pool.
Run these commands:
# lvcreate -m 1 -n thin0_meta --size 64m ssd /dev/sdb /dev/sdc
  Logical volume "thin0_meta" created.
# lvcreate -m 1 -n thin0 --size 4g ssd /dev/sdb /dev/sdc
  Logical volume "thin0" created.
# lvconvert --type thin-pool --poolmetadata ssd/thin0_meta ssd/thin0
  Thin pool volume with chunk size 64.00 KiB can address at most <15.88 TiB of data.
  WARNING: Converting ssd/thin0 and ssd/thin0_meta to thin pool's data and metadata volumes with metadata wiping.
  THIS WILL DESTROY CONTENT OF LOGICAL VOLUME (filesystem etc.)
Do you really want to convert ssd/thin0 and ssd/thin0_meta? [y/n]: y
  Converted ssd/thin0 and ssd/thin0_meta to thin pool.
Have a look at allocation:
# pvs
  PV         VG  Fmt  Attr PSize   PFree
  /dev/sdb   ssd lvm2 a--  <12.00g  7.86g
  /dev/sdc   ssd lvm2 a--  <12.00g <7.93g
# lvs
  LV    VG  Attr       LSize Pool Origin Data%  Meta%  Move Log Cpy%Sync Convert
  thin0 ssd twi-a-tz-- 4.00g             0.00   10.08
# lvs -a
  LV                     VG  Attr       LSize  Pool Origin Data%  Meta%  Move Log Cpy%Sync Convert
  [lvol0_pmspare]        ssd ewi------- 64.00m
  thin0                  ssd twi-a-tz--  4.00g             0.00   10.08
  [thin0_tdata]          ssd rwi-aor---  4.00g                                    100.00
  [thin0_tdata_rimage_0] ssd iwi-aor---  4.00g
  [thin0_tdata_rimage_1] ssd iwi-aor---  4.00g
  [thin0_tdata_rmeta_0]  ssd ewi-aor---  4.00m
  [thin0_tdata_rmeta_1]  ssd ewi-aor---  4.00m
  [thin0_tmeta]          ssd ewi-aor--- 64.00m                                    100.00
  [thin0_tmeta_rimage_0] ssd iwi-aor--- 64.00m
  [thin0_tmeta_rimage_1] ssd iwi-aor--- 64.00m
  [thin0_tmeta_rmeta_0]  ssd ewi-aor---  4.00m
  [thin0_tmeta_rmeta_1]  ssd ewi-aor---  4.00m
There are a lot of hidden volumes there, all of which work together to form the “thin0” mirrored thin pool.
Now you’re done, clean up:
# lvremove ssd/thin0
Do you really want to remove active logical volume ssd/thin0? [y/n]: y
  Logical volume "thin0" successfully removed.
All the logical volumes created inside a mirrored thin pool benefit from the thin pool mirroring. Therefore, using a mirrored thin pool with Proxmox gives you the benefits of mirroring and snapshots, and you don’t have to manually enable mirroring on the volumes that Proxmox creates.
More information about thin pools can be found in the lvmthin
man page. This also explains what the automatically-created
lvol0_pmspare volume is for - it’s used when repairing
damaged thin pool metadata.
More information about LVM RAID can be found in the lvmraid man page.
If a mirrored disk fails, you can remove it from LVM, replace it and then bring the mirror up to date. See the lvmraid man page, or search “Replacing failed LVM RAID devices” for details (we’re not going to do it in the lab).